Discover KeyShot Tips: Color Workflow Features in KeyShot 2023.3.
Color plays a very important role in the design process, influencing the overall aesthetic and appeal of any project. Crafting captivating and precisely detailed colorways does not just breathe life into your concepts but also engages clients, aligning them with the project’s vision and direction.
KeyShot 2023.3 introduces an enhanced color workflow with several updates that streamline color handling, offering a quicker and more adaptable approach. In this post, Chip Render will introduce KeyShot’s new color workflow features, and how to use them effectively.
The New Color Workflow Features in KeyShot 2023.3
1. Color as an independent asset
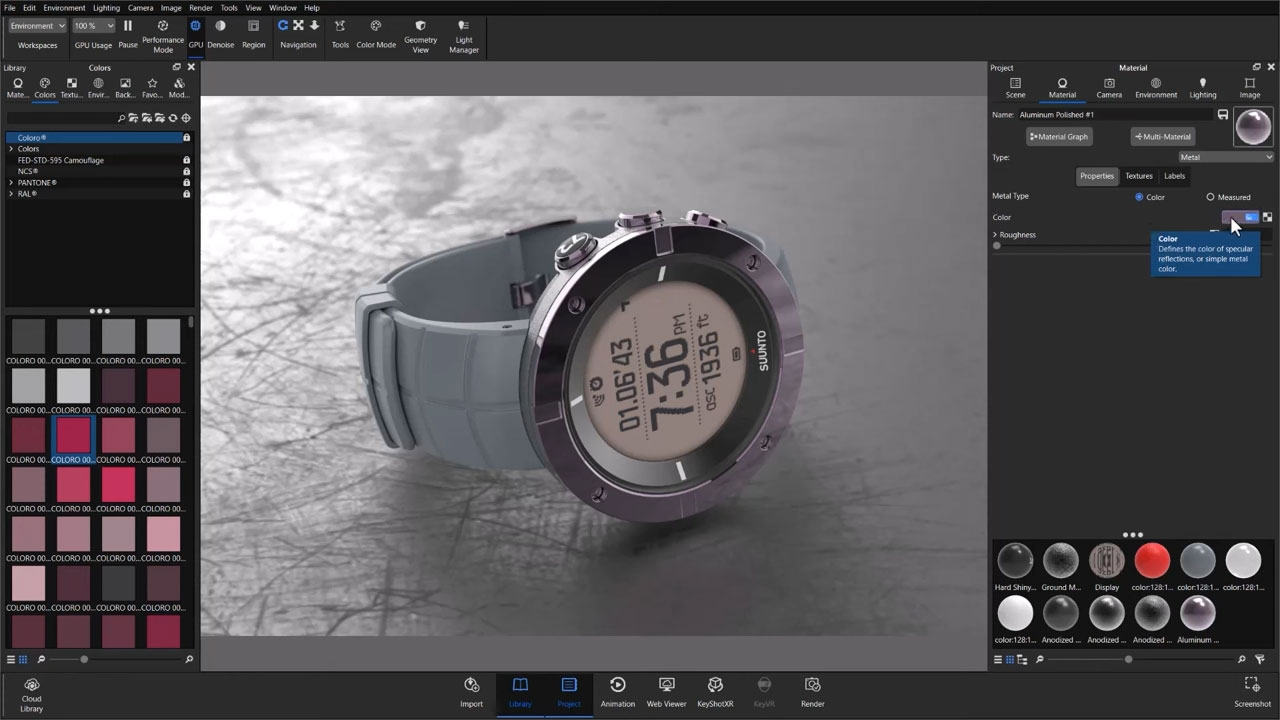
Previously, colors in KeyShot were tied to various features like materials, environments, or image styles. While this connection remains, KeyShot’s approach to working with colors has evolved significantly. Now, color instances are independent assets, detached from specific features or locations they are used in. This change means that modifying a color instance updates all materials linked to it, simplifying the process.
- To create a color, simply drag and drop a color from your library into the scene. Then, in the color picker, assign it a name for easy reference.
- Once you have a named color in the scene, its versatility shines through. You can use this color elsewhere by dragging and dropping it from the library into the scene, giving it the same name as an existing color, or selecting an existing color from the scene colors list.
2. Multi-Colors
Other than reusing color instances, KeyShot 2023.3 introduced a fresh concept called “Multi-colors.” Much like Multi-Materials, a Multi-color is a versatile list that references different color instances across the scene.
Using a Multi-color across your project follows a similar pattern to working with individual colors. However, the linking process differs slightly:
- Within a part’s material settings, locate the color picker.
- Adjacent to the multi-color naming field, a swatch icon expands into a dropdown showcasing existing multi-color options. Here, you can easily select a multi-color to link or unlink it if it is already linked.
3. Color Mode
Need to dive deep into your scene’s colors? Look no further than Color Mode! This feature offers a focused view by hiding most UI features, letting you concentrate solely on your color libraries, colorways, and multi-colors.
A quick tip: Ensure you have set up Multi-Colors for your scene beforehand, as you will not be able to add more once you are inside Color Mode.
How to Use the New Color Workflow Features in KeyShot 2023.3?
Step 1: Creating a Multi-Color via the Color Picker
Working with Multi-Colors is similar to how Multi-Materials functioned previously. Begin by selecting a part within your scene where you want to add a Multi-Color. Open the Material Properties specific to that part. Look for the color window under the Material Properties and open the picker. Depending on the material type, you might find the color window connected to the property labeled Color or Diffuse.
Now, with your color picker open, go to the fanned-out swatch book icon positioned to the right of the naming field at the window’s top. Clicking this icon reveals a context menu that unveils a Sub-Color list upon selection. This Sub-Color list serves as the space to manage the different color choices contributing to your Multi-Color palette.
Step 2: Adding Colors to Your Multi-Color
There are a few fantastic ways to populate your Sub-Color list:
- The first option is to hit the plus sign and craft a color from scratch using the color parameters within the window. You can also input specific hex codes here. Don’t forget to give your color a name either before or after tweaking it to your liking.
- Another method involves adding colors from the swatches at the bottom of the color picker window. Start by hitting the plus icon to add a new color. Then, pick a Swatch from either the Scene Color Swatch library or the Color Swatches library to append that color to your list. Here, renaming is not necessary as it adopts the existing name linked to the color swatch you added.
- The third way involves accessing the color library from the Library panel. Here, you can explore various color systems available by default in KeyShot (such as Pantone, Coloro, NCS, etc.). Simply select your preferred color from the library and drag-drop it into the list. Similar to the second method, there is no need to rename the color, as it retains the same color info linked to the swatch in the library.
These versatile methods can be applied to any part of your scene that calls for a multi-color.
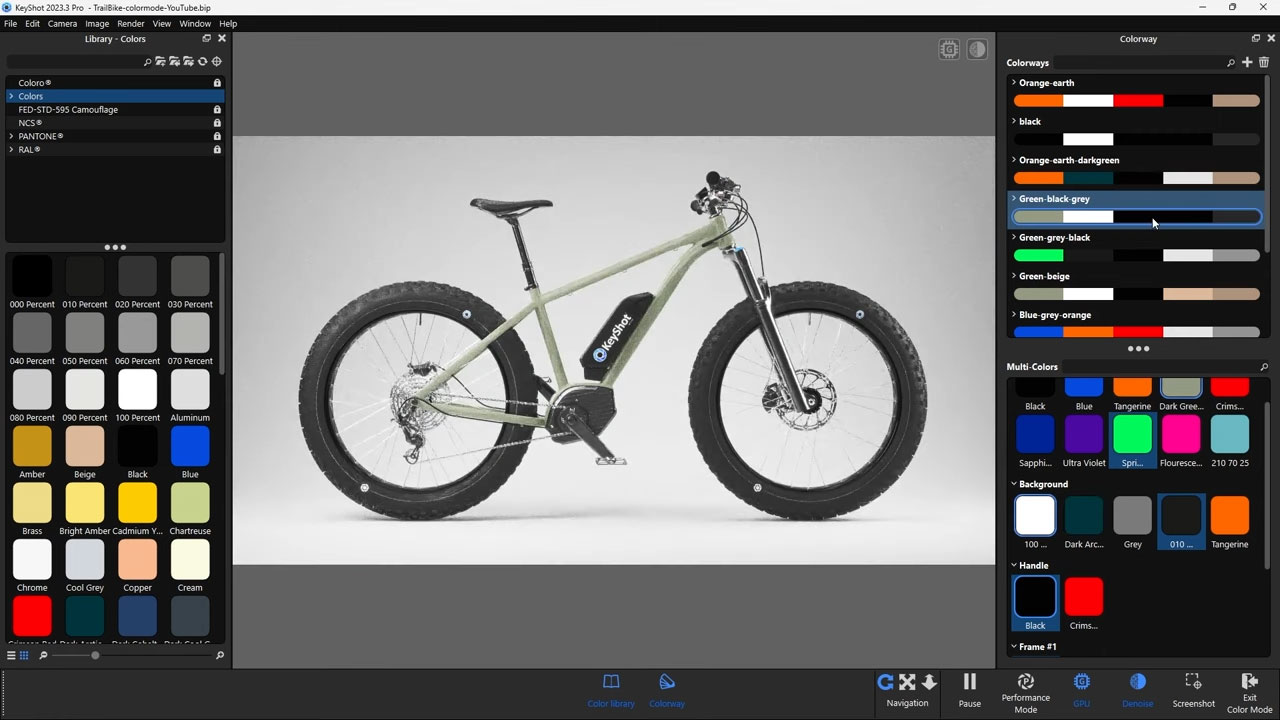
Step 3: Creating Color Ways using your Multi-Colors
Once your multi-color setup is good to go, kickstart the Color Mode window by opting for it from the ribbon along the top of the real-time view. If the Color Mode option is not visible, simply right-click on the ribbon to access the Context menu, and ensure that there is a checkmark next to Color Mode.
Once activated, the focus shifts to a color-centric workspace that takes center stage in the KeyShot program window. Here, your library panel is streamlined, displaying only the color libraries and a new Colorway panel on the right side of the screen.
The Colorway panel is split into two sections: the top segment houses your list of crafted colorways, while the bottom exhibits the different multi-colors assigned to each part of your model. In this bottom segment, multi-colors can be easily tweaked by removal or renaming, while new colors can be infused by dragging and dropping them from the library panel on the left or directly from other multi-color lists.
Once your multi-color palette is all set, crafting colorways is a breeze. Simply hit the plus icon adjacent to the colorway naming field. This action generates a colorway from the present visible color setup. Colorways can be further fine-tuned by handpicking the colors for each part in the current colorway. Additionally, you can right-click on each colorway for renaming or deletion if required.
Step 4: Render Colorways via the Render Queue
When your colorways are picture-perfect, it is time to queue them up for simultaneous rendering. Head over to the Render window and tap into the Queue tab. Along the right-hand side of this window, you will spot the Add Colorways button waiting for you. Click on it. The “add to queue” window for your colorways will open up, enabling you to cherry-pick the specific colorways you want to include. Once you’ve made your selections, simply kick off your queue and sit back as your vibrant colorways start materializing in your render folder!
Wrap up
To sum up, KeyShot 2023.3’s brand-new color mode and color workflows make crafting precise colorway variations a breeze. Its user-friendly drag-and-drop interface and the power to batch process renders with just a click empower you to elevate your CMF workflows. These enhancements offer a more adaptable range of visuals, catering perfectly to the needs of stakeholders and manufacturing partners worldwide.
 Chip Render Farm is one of the few cloud rendering services that support KeyShot. With our powerful IaaS model and 1/2/4 x GPU RTX 3090 servers, you will be able to speed up your KeyShot projects several times. Join Chip Render now and have your own Cloud Workstation from only $2.9.