
CHIP RENDER DOCUMENTATION
Welcome to the Chip Render Farm technical documentation. This documentation is intended to guide and advise you in your use of our rendering service.
1. SUPPORT SOFTWARE
Chip Render Farm supports all 3D software and renderers, including the most popular in the industry: Cinema 4D, Blender, 3ds Max, Maya, Houdini, and so on.
2. WORKFLOW
Chip Render only supports your use in the Chip Render App. After downloading this app, please follow some steps here to use Chip Render.
3. SYSTEM FEATURES
In this section, Chip Render will guide you to Change the package; Schedule Shutdown; Clone the machine; Snapshot, and Report issues. Let’s check it out here!
4. CHIP RENDER
If you need some guide about Account, and Notification settings you can find it here. In addition, Chip Render’s pricing, Affiliate Program, and some Must-know tips will be interesting things that you don’t want to miss.
SUPPORT SOFTWARE
Chip Render Farm supports all 3D software and renderers, including the most popular in the industry: Cinema 4D, Blender, 3ds Max, Maya, Houdini.
Chip Render is optimized for:
- Single GPU rendering in Unreal Engine, Twinmotion, Lumion, Enscape, Blender Eevee, D5 Render, and more.
- Multiple GPU rendering in Redshift, Octane, Blender Cycles, Arnold, V-Ray, Daz 3D, KeyShot, and more.
- CPU rendering in Maya, Arnold, Corona, V-Ray, SketchUp, Blender, and more.
Install and render on your favorite 3D software and be amazed by the ultra-fast speed and cheap price of our online CPU & GPU render farm.

WORKFLOW
1. Register
Create an account
Step 1: You can easily download our Chip Render application Here. Set it up on your computer.
Step 2: After installing the Chip Render, open the Chip Render App and Follow the instructions below to fill in the registration.
- Username: choose a username 03-20 characters long. Usernames can contain letters (a-z) and numbers (0-9).
- Email address: enter your correct email address and Chip Render will send a verification message.
- Phone: enter your mobile phone number for better support.
- Country: select your country to identify the nearest server location.
- Password: 6-50 characters, valid values for passwords include at least one lowercase, one uppercase, one numeric, one special character (!, @, #, $, %, ^, &, *), and not contain spaces.
- Re-type password again.
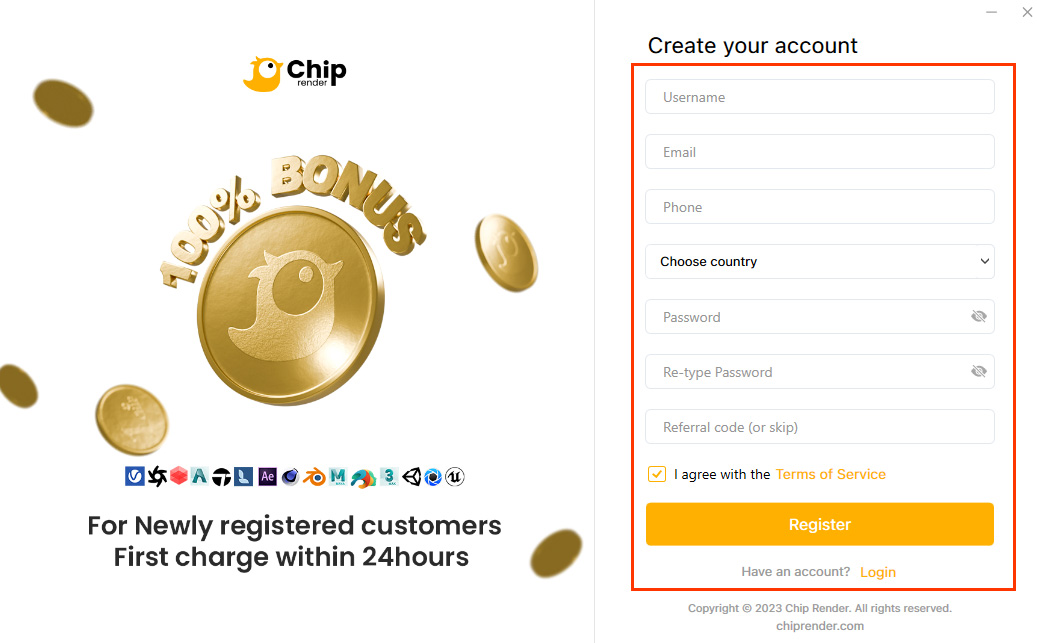
- Choose the checkbox “I agree with the Terms of Service” to confirm.
- Choose REGISTER.
Step 3: Verify your account through the link that Chip Render sends to your email address.
Login
Open Chip Render App » Enter your Chip Render credentials » choose LOGIN.
2. Making Payments
Chip Render allows you to make payments through several payment methods including OnePay, Paypal, Bank Transfer. In addition, for customers in Vietnam, we also accept Momo payment gateway. The minimum amount of money for each transaction is $50.
The table below shows the number of system machines and the data storage capacity you have based on your accumulated recharge.

To make payments
Step 1. Open Chip Render App, choose Payment » select Payment Gateway.
Step 2. On the Payment Gateway page, you can follow top-up through E-wallet including OnePay, Momo, PayPal, and Bank transfer.
E-wallet
- On the Payment Gateway page, enter the amount of money to pay.
- In Payment Way section, choose the E-wallet that you want (OnePay/Momo/PayPal) » select Recharge Now to make payment.
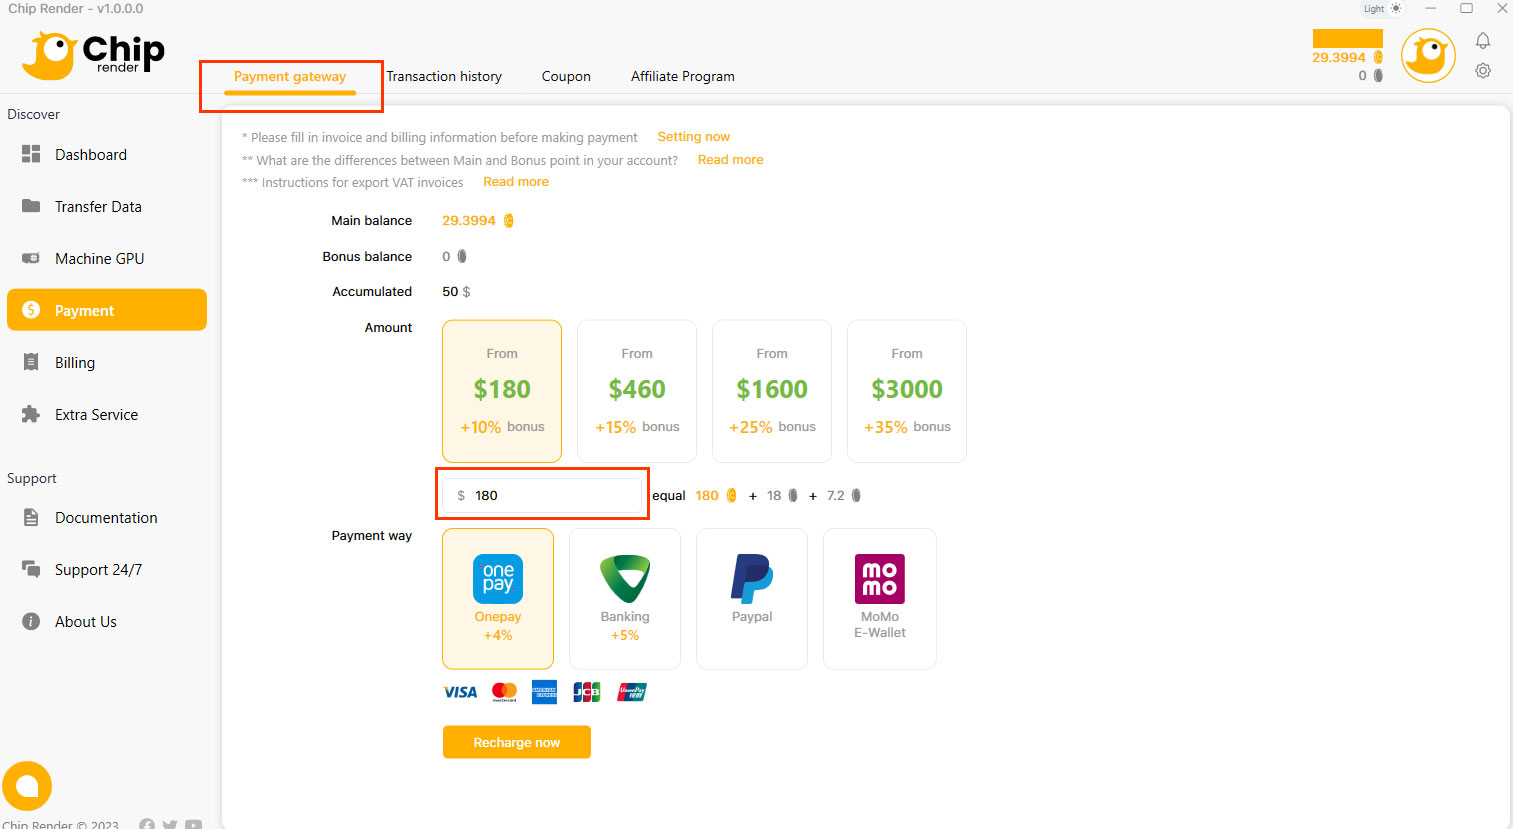
– OnePay supports Visa, MasterCard, American Express, JCB, and UnionPay cards.
– Momo Only for Vietnamese.
– PayPal support visa, Master, American express.
Bank transfer
In case of making payments by Bank Transfer: In Payment Way section, choose the Banking icon » select Recharge Now.
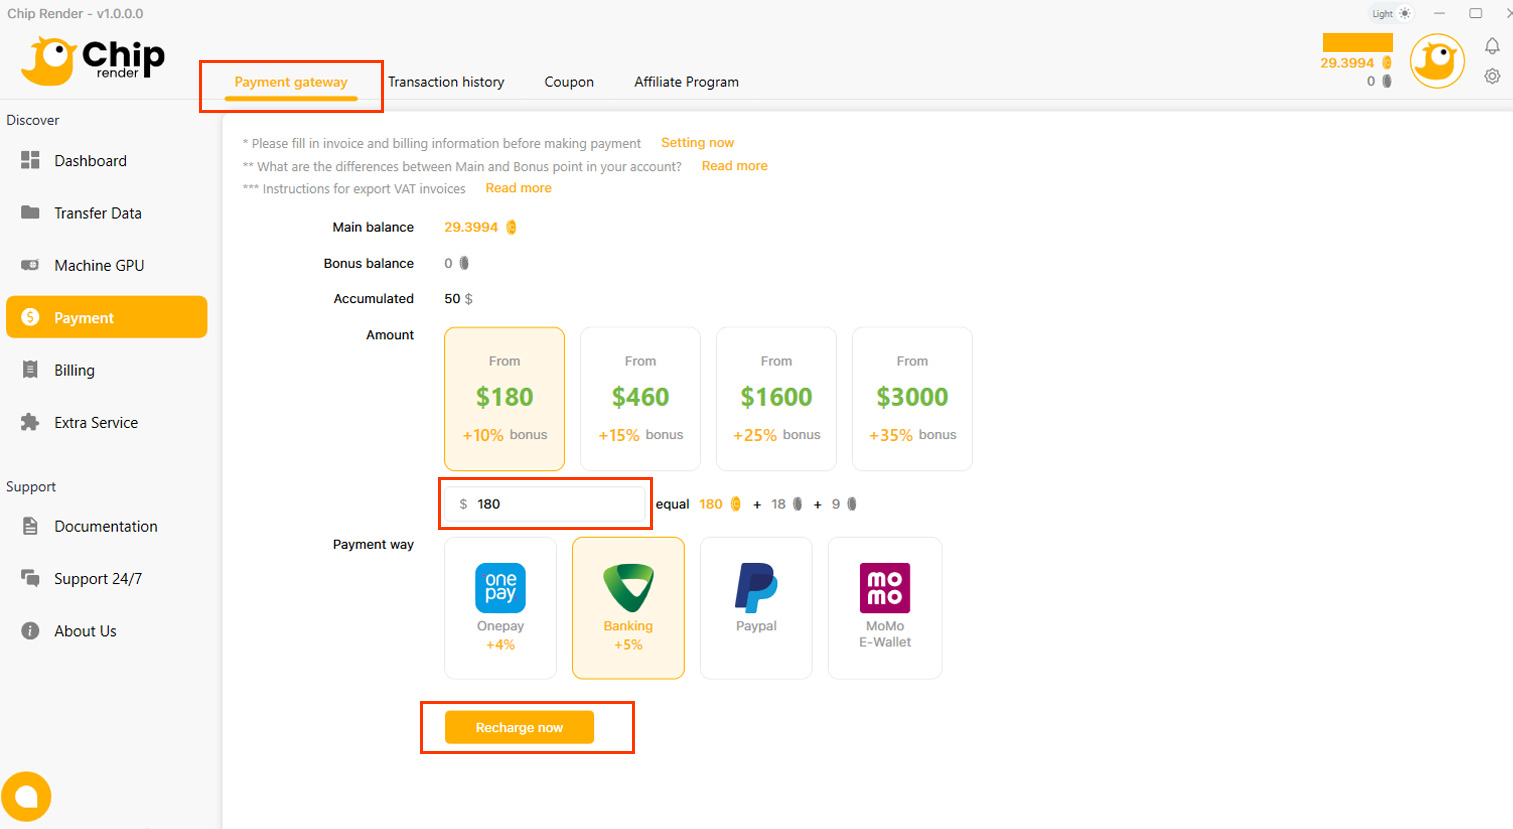
In the information Banking box, scan the Payment QR-code via the Banking app or follow the information below to make the payment.

Beneficiary Name: CHIP RENDER SOFTWARE JOINT STOCK COMPANY
Beneficiary Address: No. 06 Central Area of Department X16 Ministry of Public Security, Group 83, Khuong Trung Ward, Thanh Xuan District, Hanoi City, Vietnam
Account Name: CTCP PHAN MEM CHIP RENDER
Account No: 1473418888
Bank Name: Vietcombank Thanh Cong Branch
Bank Address: [/]
Swift code: [/]
After making payments successfully, screenshot the transaction information and send it to us via live chat or email address [email protected].
Information: In case you need to change your Invoice & Billing information, you should correct your Invoice & Billing information before depositing.
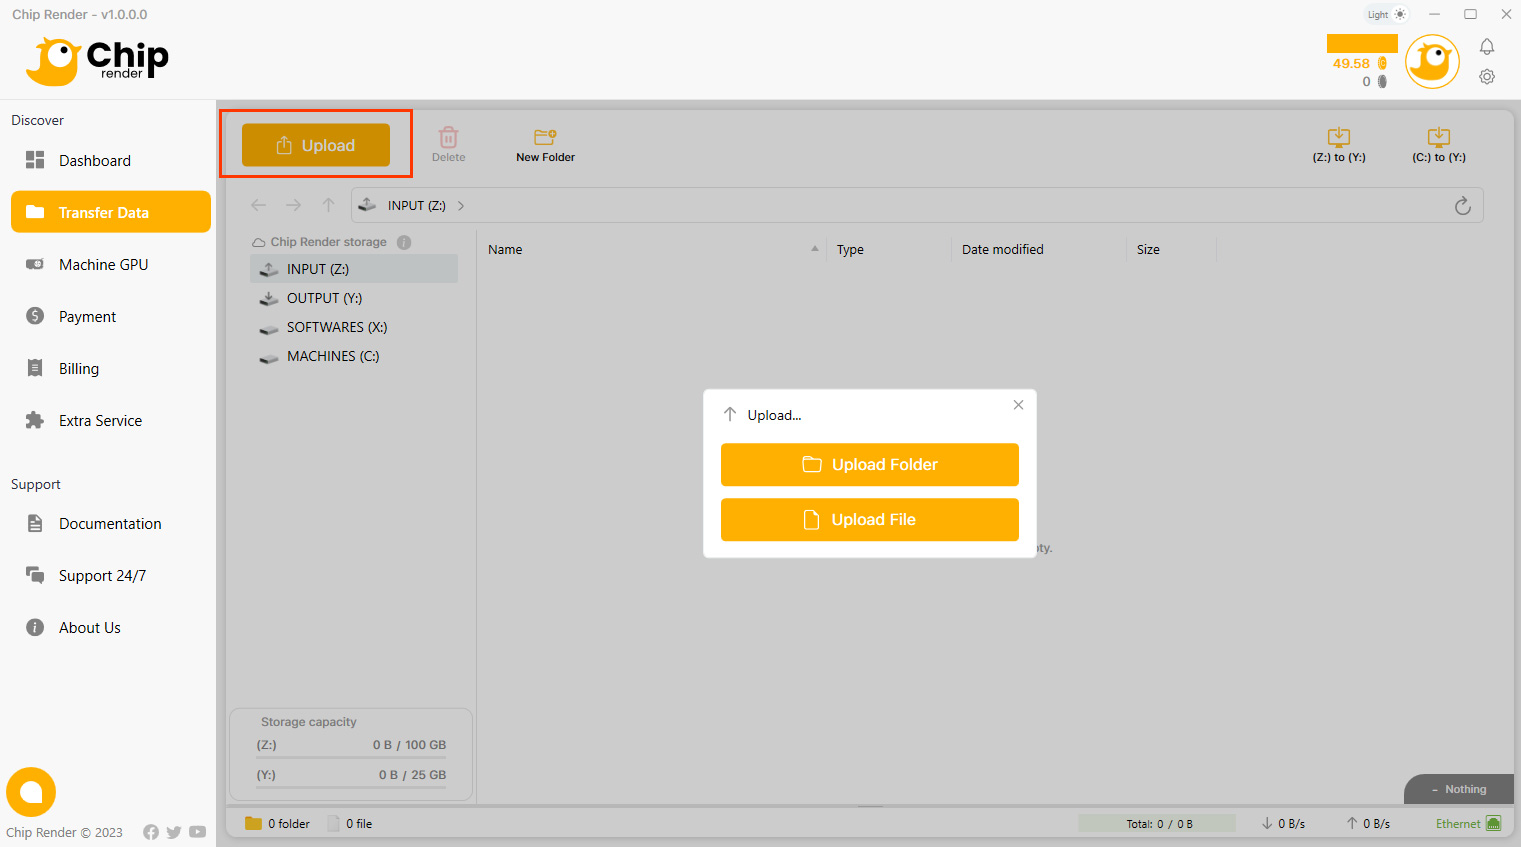
3. Transfer files
Upload data projects to Chip Render server
To save time and money, transfer your project files from your computer to our remote server before starting the server.
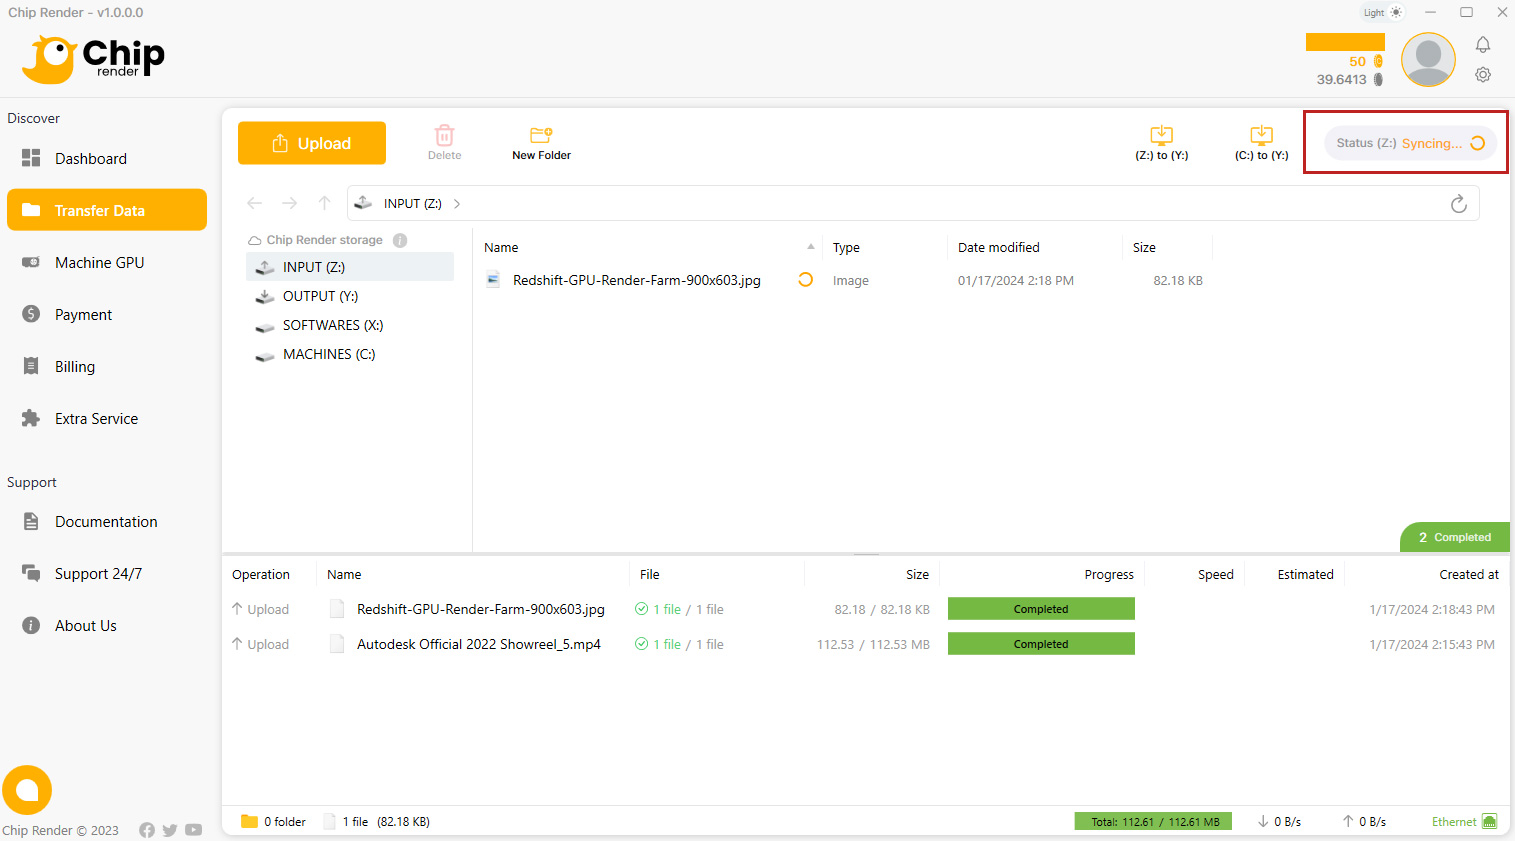
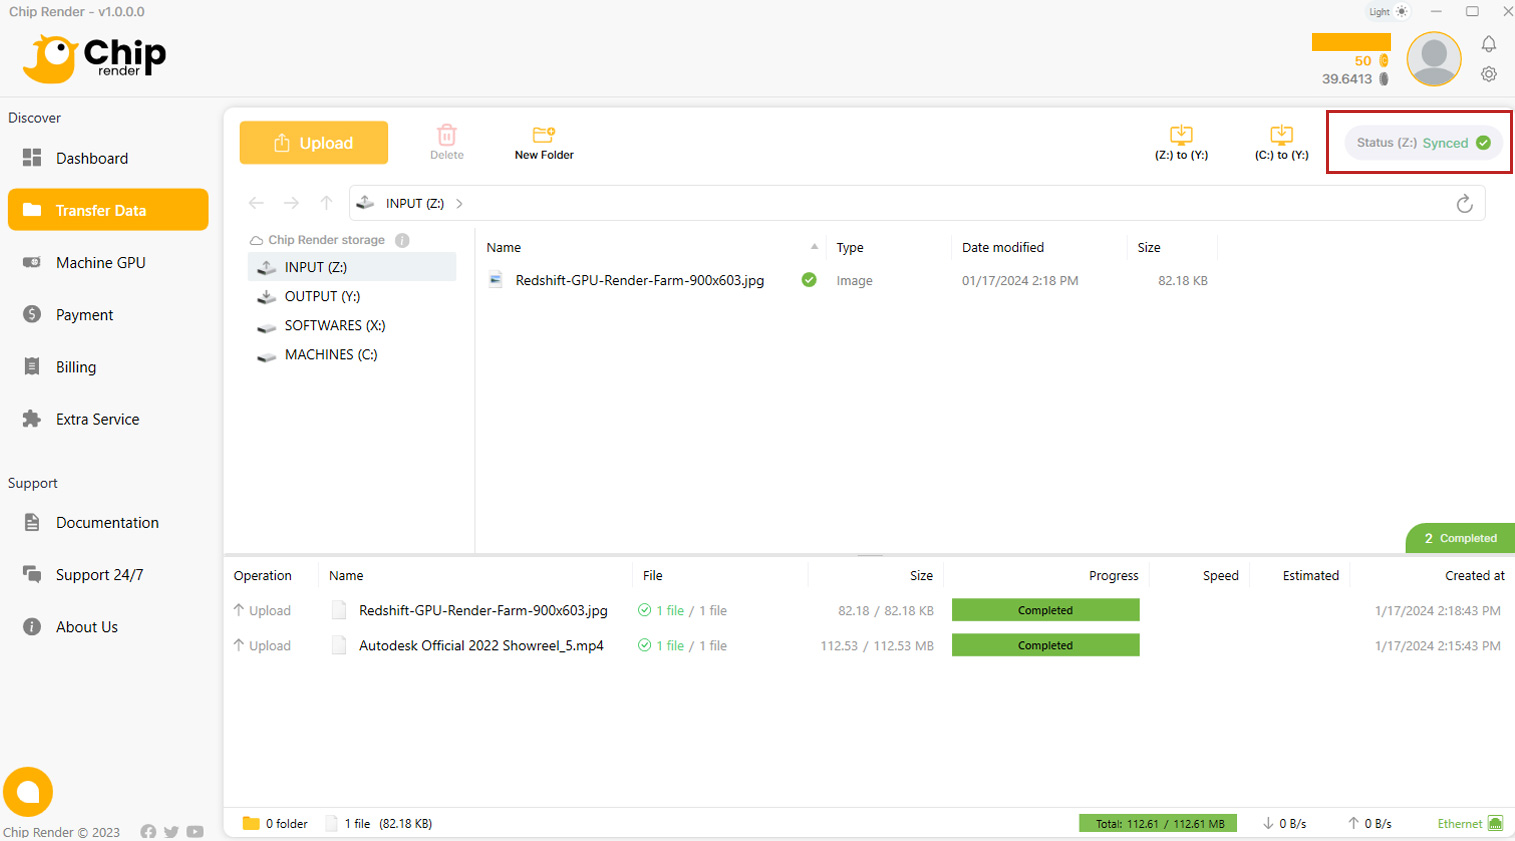
We have provided an input drive for you to transfer your data to our server, it is called INPUT (Z:). Please upload your data projects to INPUT (Z:), and it will be automatically synced to the Z drive of the Chip Render machine.
Step 1. Go to the Transfer Data tab.
Step 2. Select INPUT (Z:) » Upload your files (project files, assets, texture, etc) necessary for the render and software installer (if any) by choosing Upload.
Select Upload: You can choose Upload Folder or Upload File (Or drag and drop data to the Transfer data screen to upload).
Step 3. Wait for the uploaded data to sync to the Z drive
- Syncing shows that the folder is being synced to Z drive.
- Synced means the sync process is done. Your data has been synced to the Chip Render server.
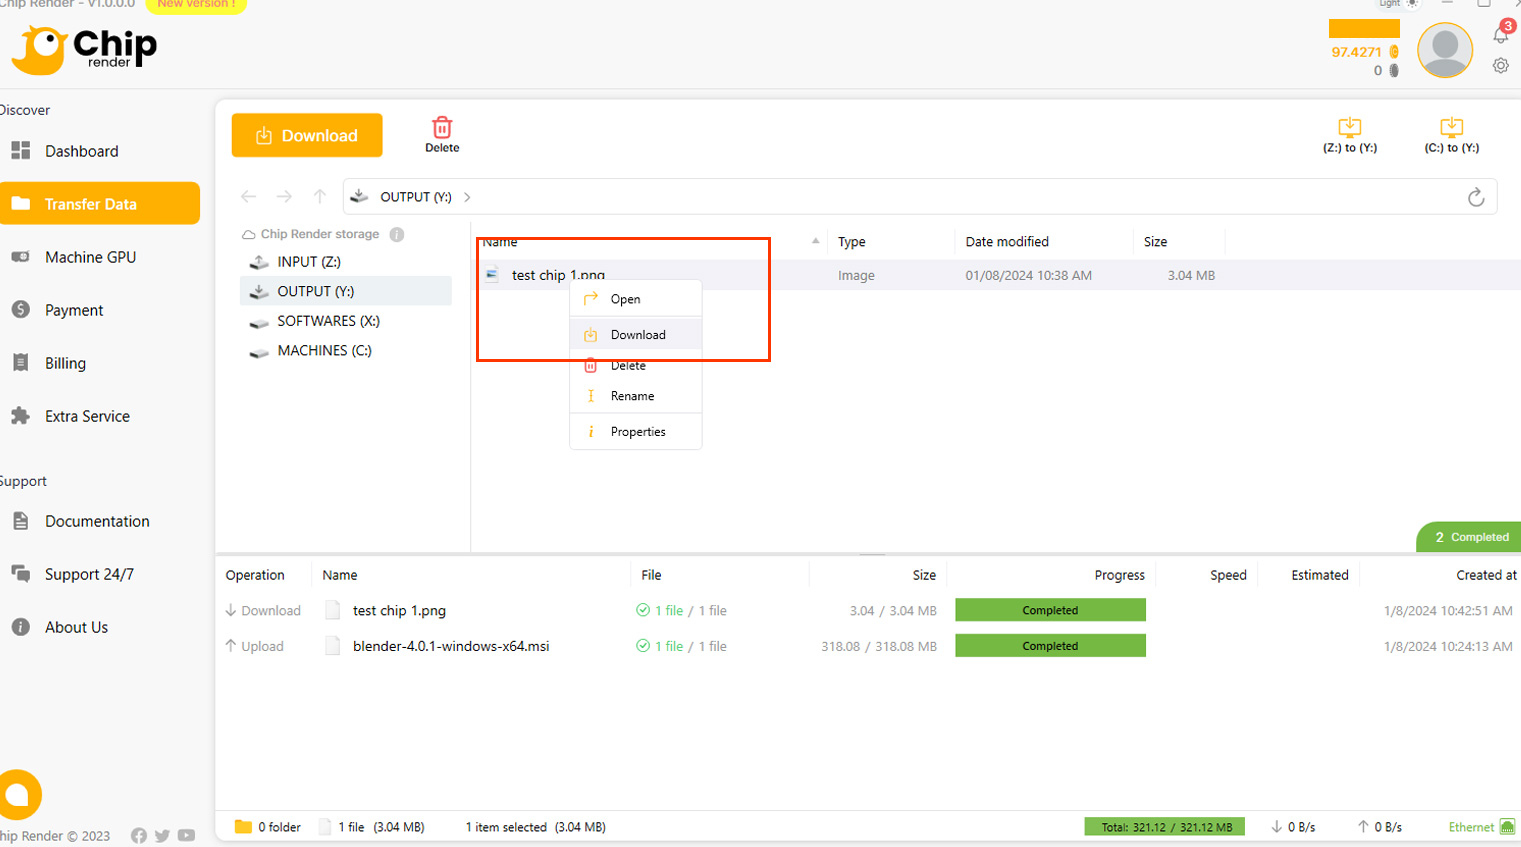
Download files after rendering as described in the Get results step
- Move your output files from C: drive to OUTPUT (Y:) drive in Chip render machine. You can download the results file in OUTPUT (Y:) drive on the Transfer Data tab.
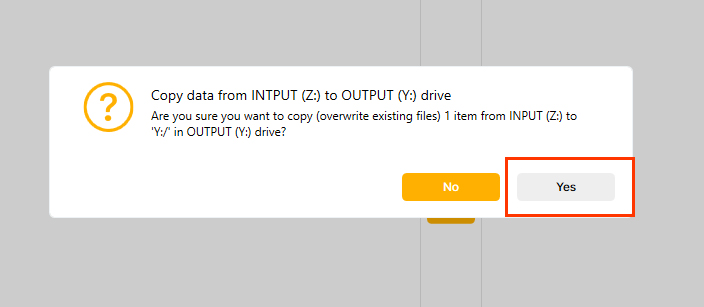
- In case you copy the output file by mistake to the INPUT (Z:) drive. Please use the (Z:) to (Y:) feature in Transfer Data tab to move your output files from the INPUT (Z:) drive to the OUTPUT (Y:) drive:
Go to (Z:) to (Y:), click on it.
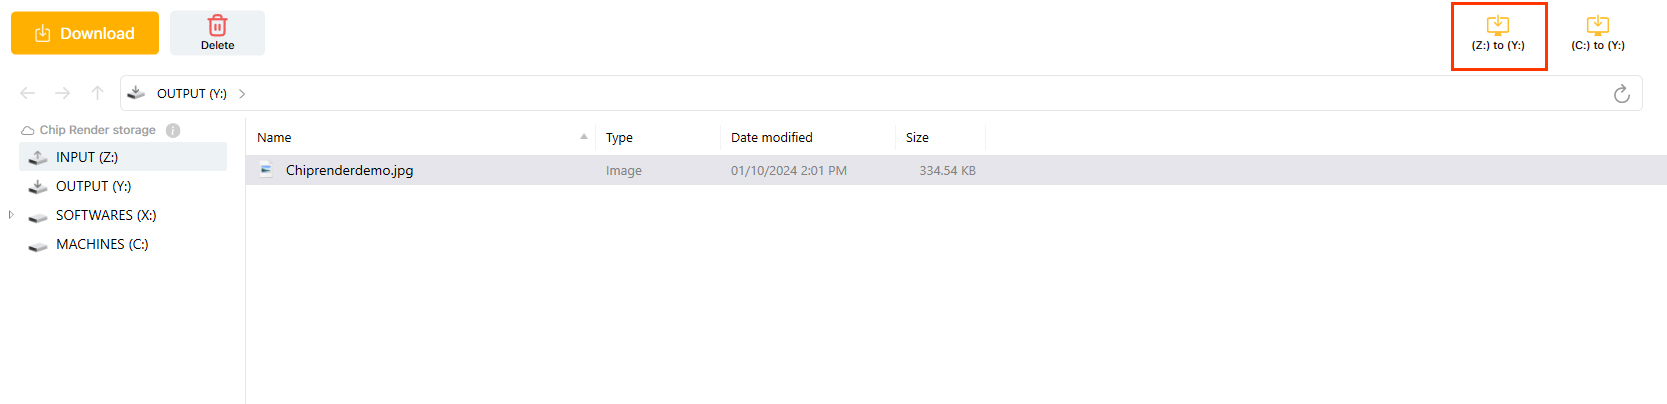
Select the file/folder to move to drive Y » Click the arrow icon to switch to (Y:).
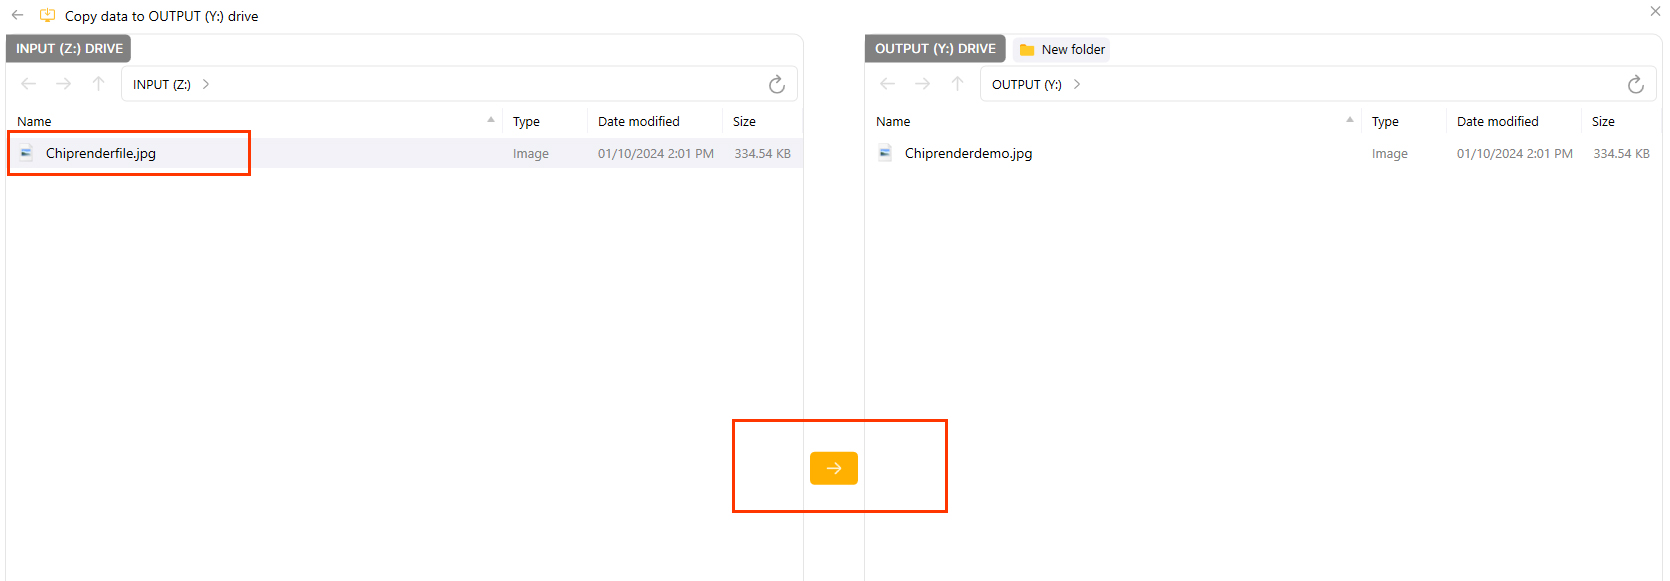
After copying the data, please wait for our system to sync to the cloud, then you can download data from Chip Render Cloud to your personal computer.
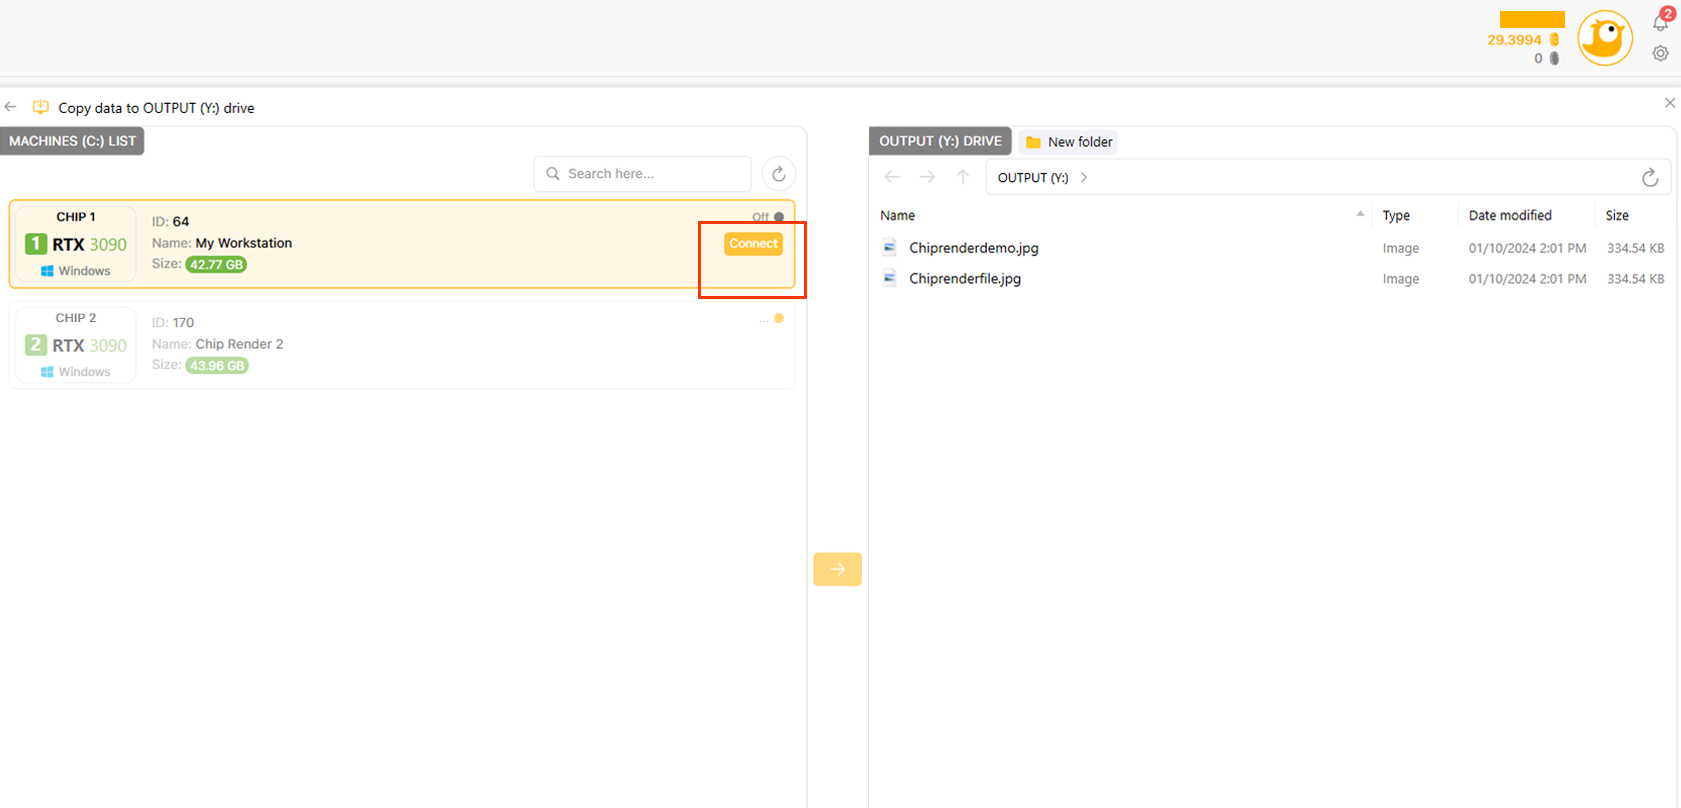
- In case you have not yet copied the output files to the OUTPUT (Y:) drive in the Chip Render machine, your data is still in Chip Render machine. You can move your output files from the IMAGES (C:) to the OUTPUT (Y:) drive without booting the machine.
– Click (C:) to (Y:) or MACHINES (C:).
– A list of the user’s machines appears. Select the machine where you need to transfer data to drive Y » click Connect
– Go to the data storage location » select the file/folder to move to drive Y » Click the arrow icon to switch to (Y:).
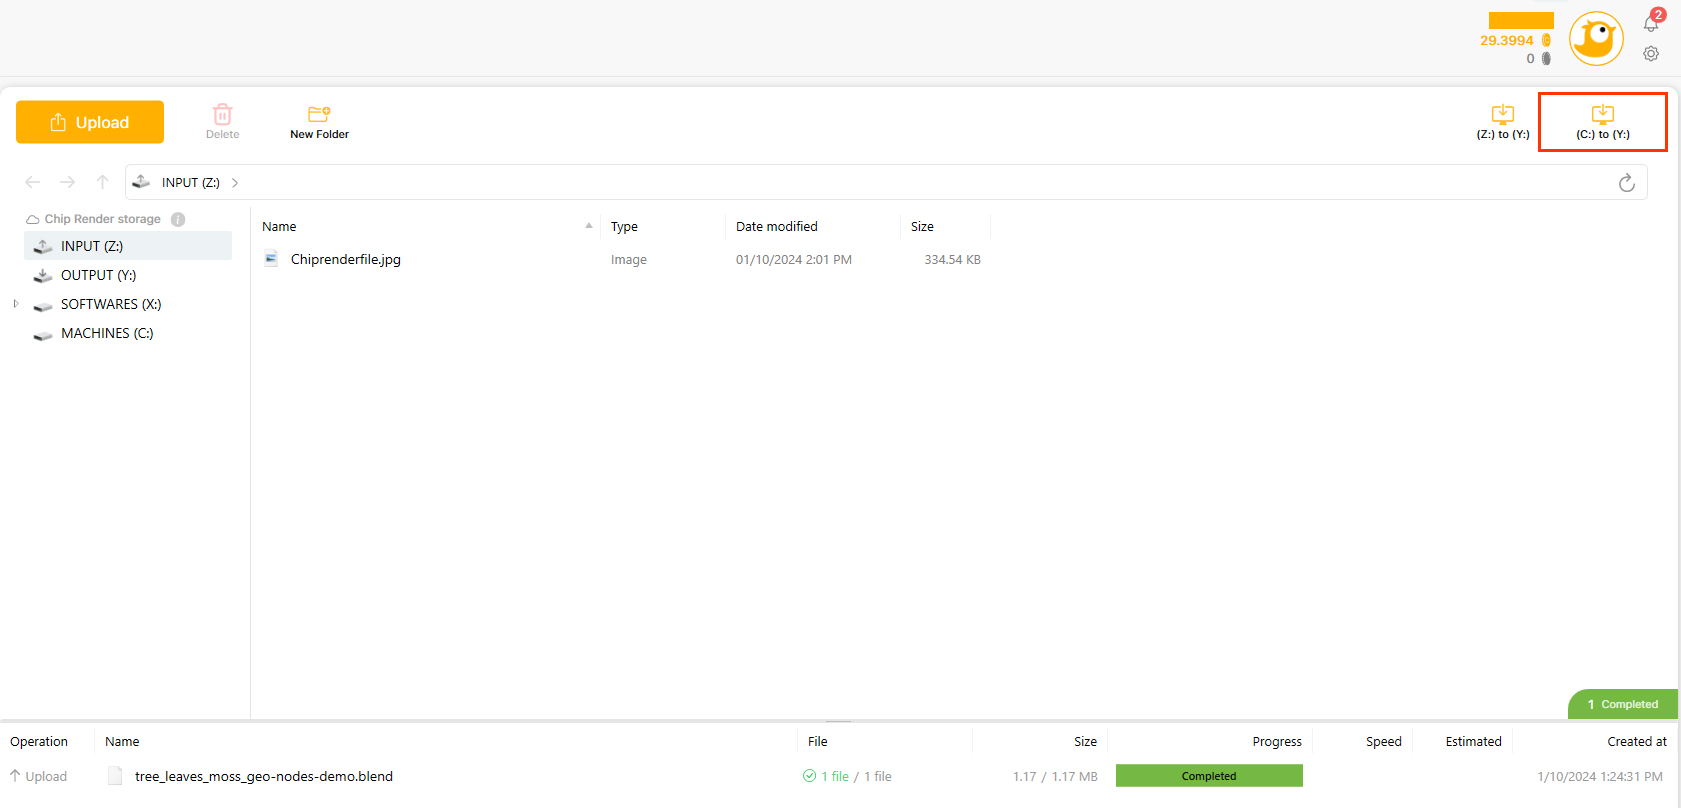
Task view: Show job status
– Uploading/Downloading: the file/folder is uploading to the app or downloading file/folder from app to your local machine. In this state, you can Stop/Cancel and Resume/Retry the Job by Right-clicking on the uploading/ downloading job.
– Completed: Job status has been successfully uploaded/downloaded.
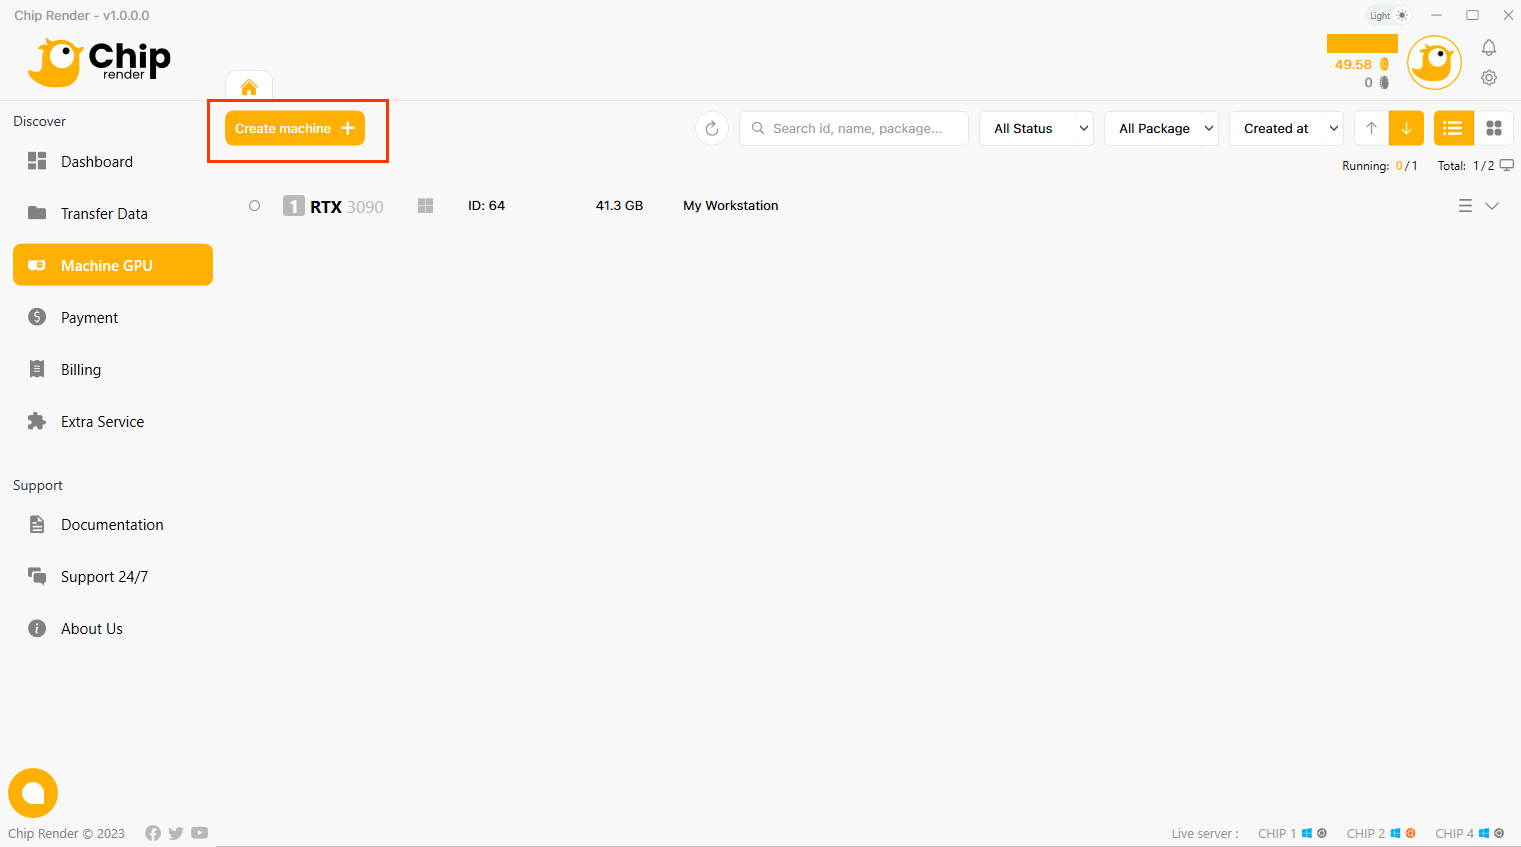
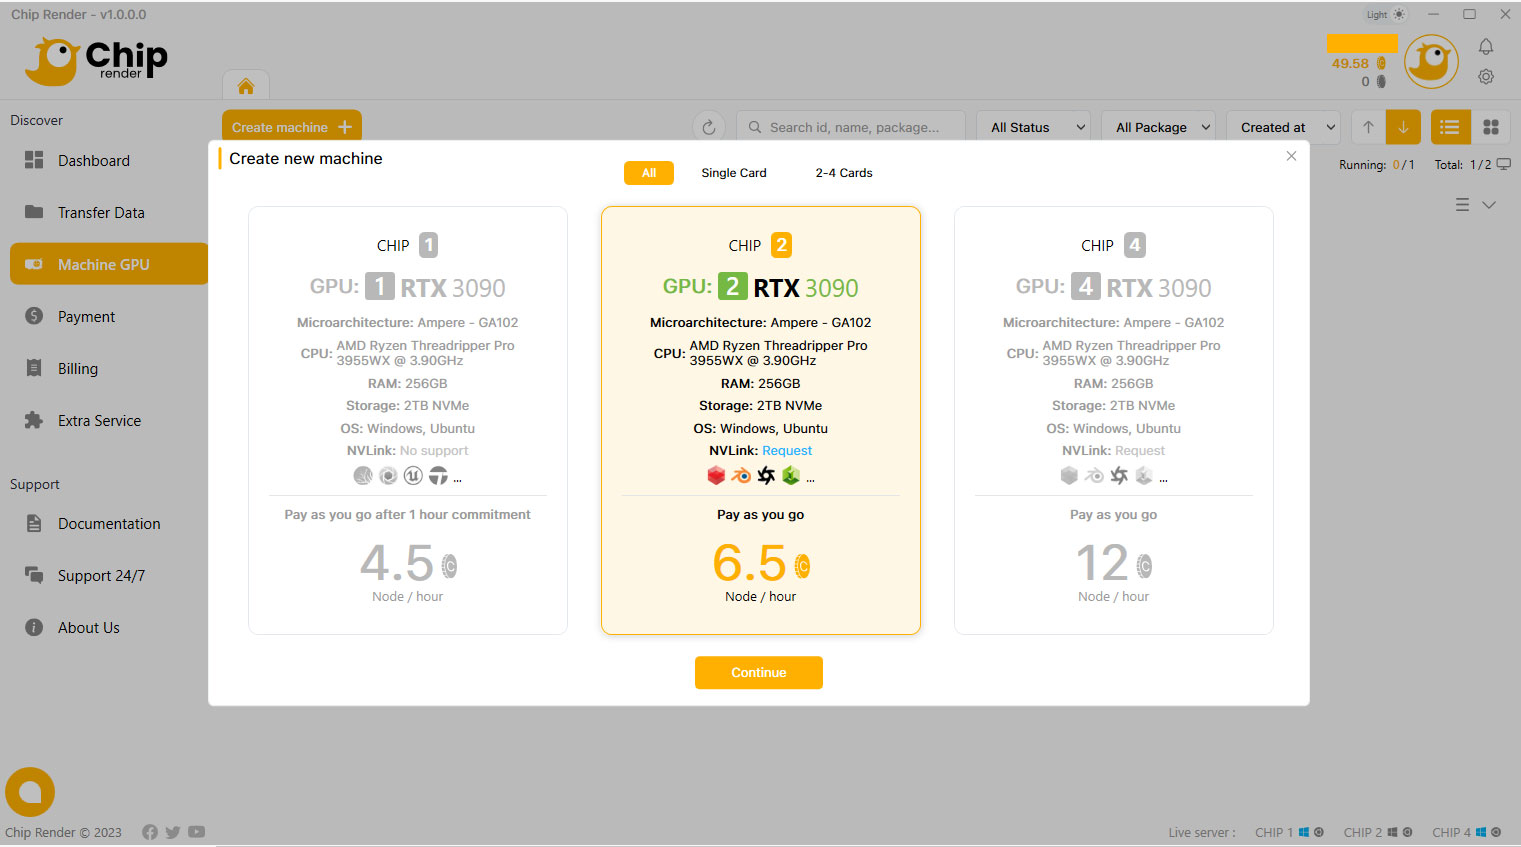
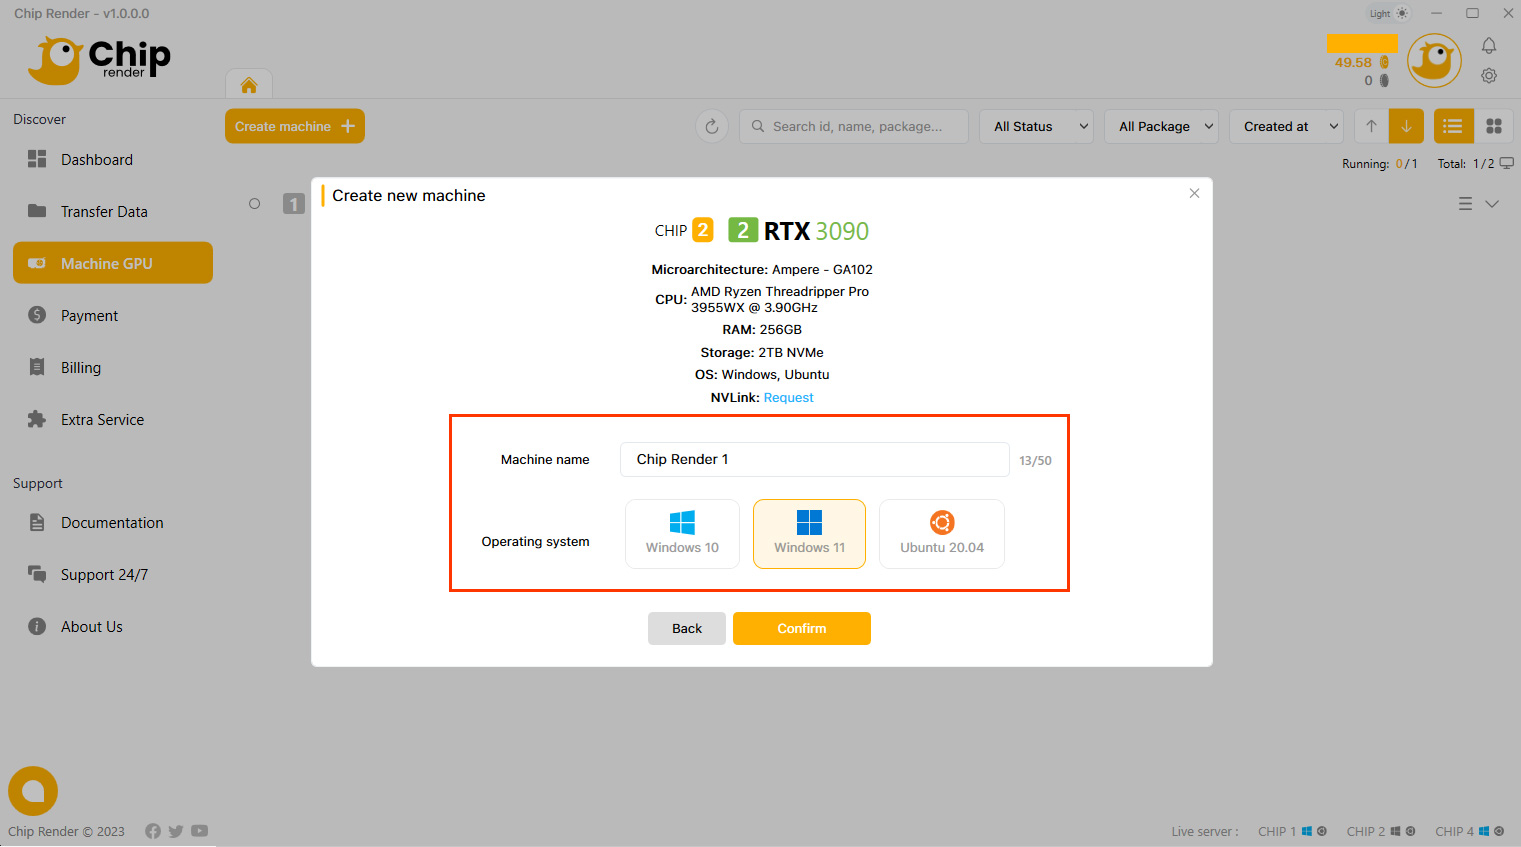
4. Create machine
The machine in the Machine GPU section stores your working environment (installed software and saved data) in our cloud system. Chip Render provides single to multiple GPU servers. Depending on your demand regarding the purpose of 3D rendering or AI training, the use of software & plugins, and the project scale, you should choose the suitable server package.
1. Now, go to Machine GPU section > Create machine.
2. Select a configuration package you want to use and click the Continue button.
3. Name your machine, choose the OS type and click the Confirm button.
5. Boot a machine
After creating a new machine, click “Boot” > “Boot Machine” and wait a few minutes.
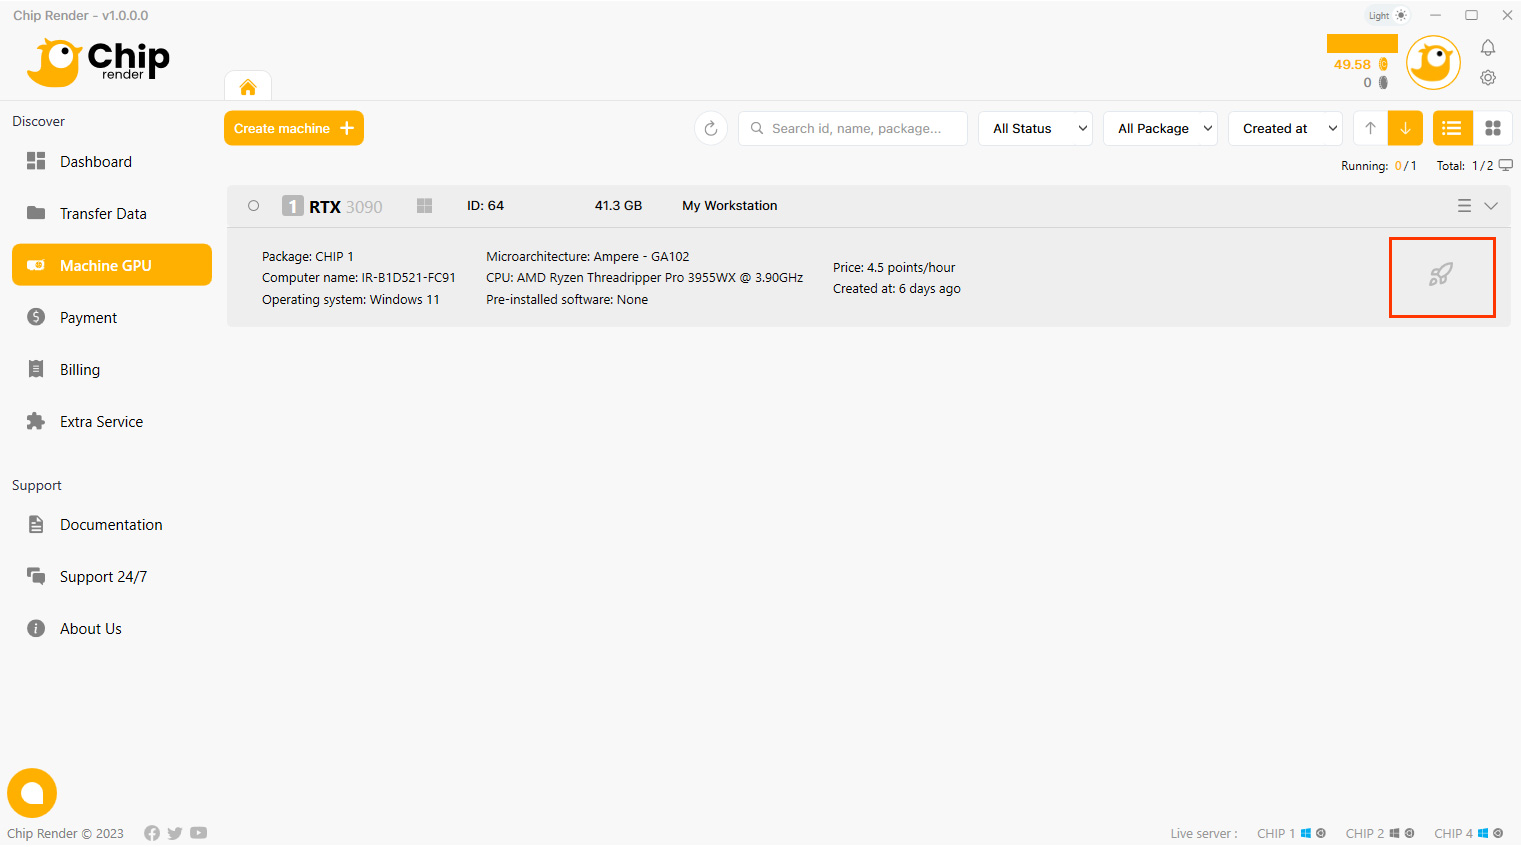
Typically, it takes around 10-15 minutes to boot a machine. The time it takes to boot is dependent on the size of the machine, which includes everything you have on your server such as installed software, saved data, and so on. The more data you have on the machine, the longer it will take to start.
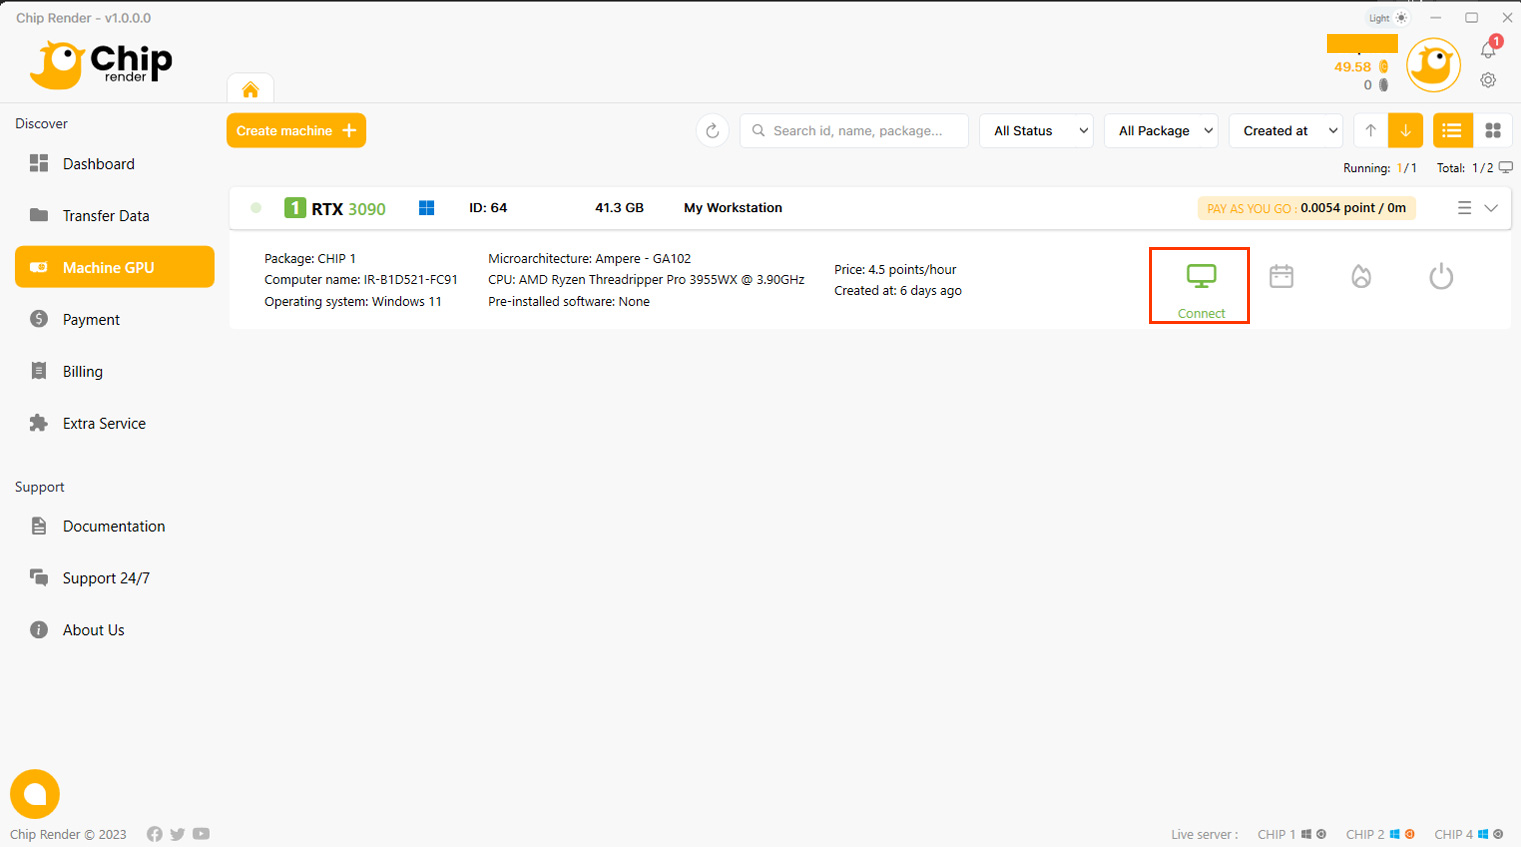
6. Connect to the remote machine
After your machine is booted successfully, your user interface will appear with a CONNECT icon (our system starts charging you from this step).
You should click CONNECT to connect to our remote server immediately.
This is the screen display after you click the Connect icon, the most potent gateway will always appear as default.
A tip for you to automatically connect to the best gateway by go to the setting icon beside your avatar and check to check box “Automatically connect to the best remote desktop gateway.”
Here you are! You’re on our remote server! You will take complete control of it, using it is the same as using your PC. As we suggest, you can install any software you want on this remote server and install it ONLY ONCE. Your working environment will be saved after each session of use. Therefore, you won’t have to re-install anything the next time you use it.
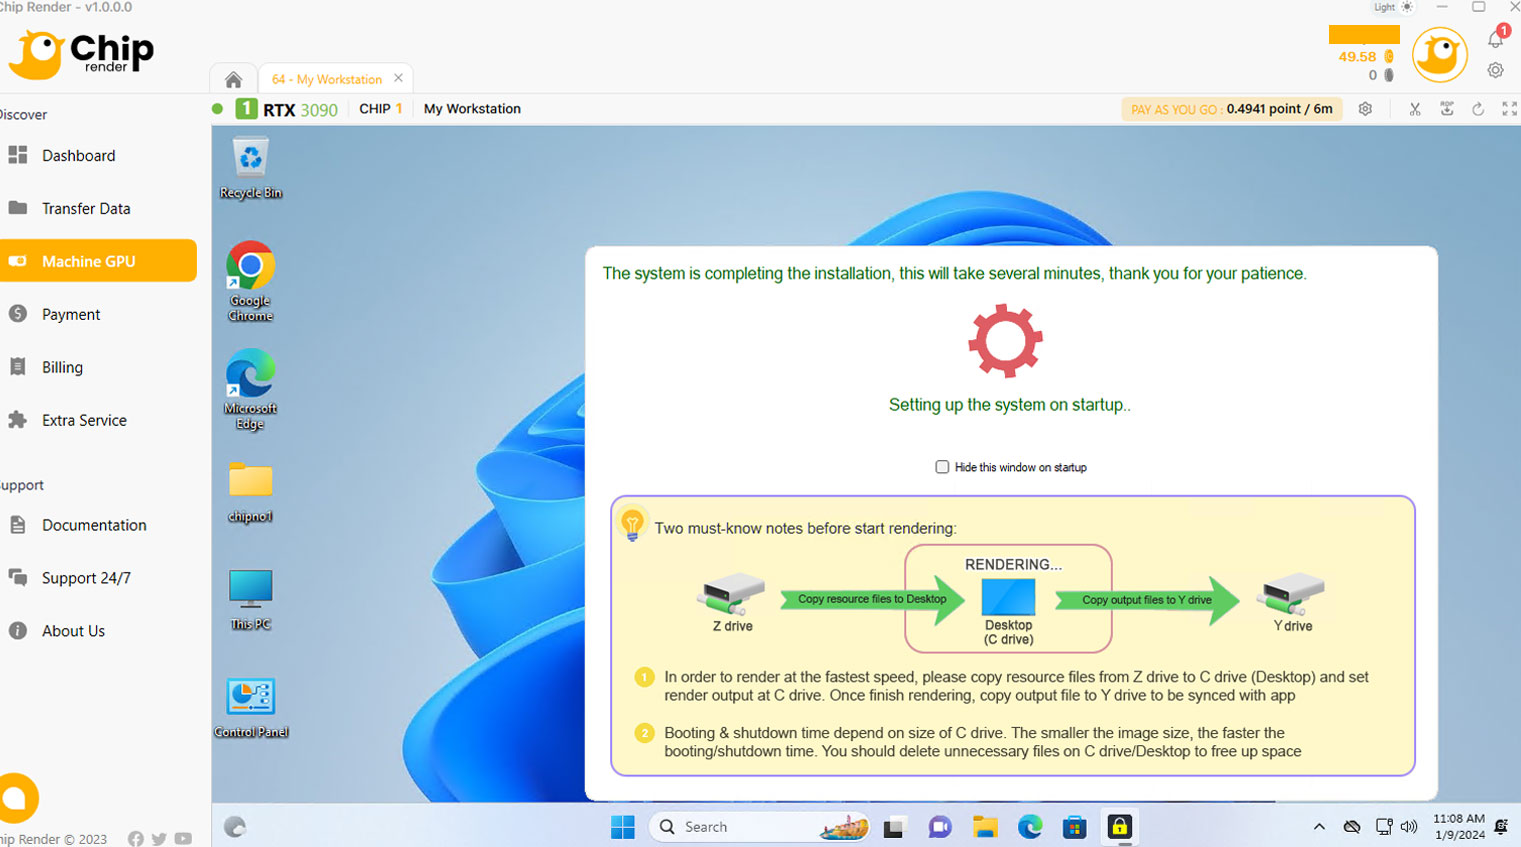
Now, set up your working environment (installing software and transferring your personal licenses) and start rendering.
All the uploaded files to our Chip Render App app will be on the (Z:) drive. However, Z is just a network/virtual drive for transferring files. Working directly on this drive can cause problems. Therefore, you will have to copy all of the files to the hard drive (Desktop/C:), then do everything (installing software, opening project files, saving output, and rendering) for stable rendering and avoiding network-related issues.
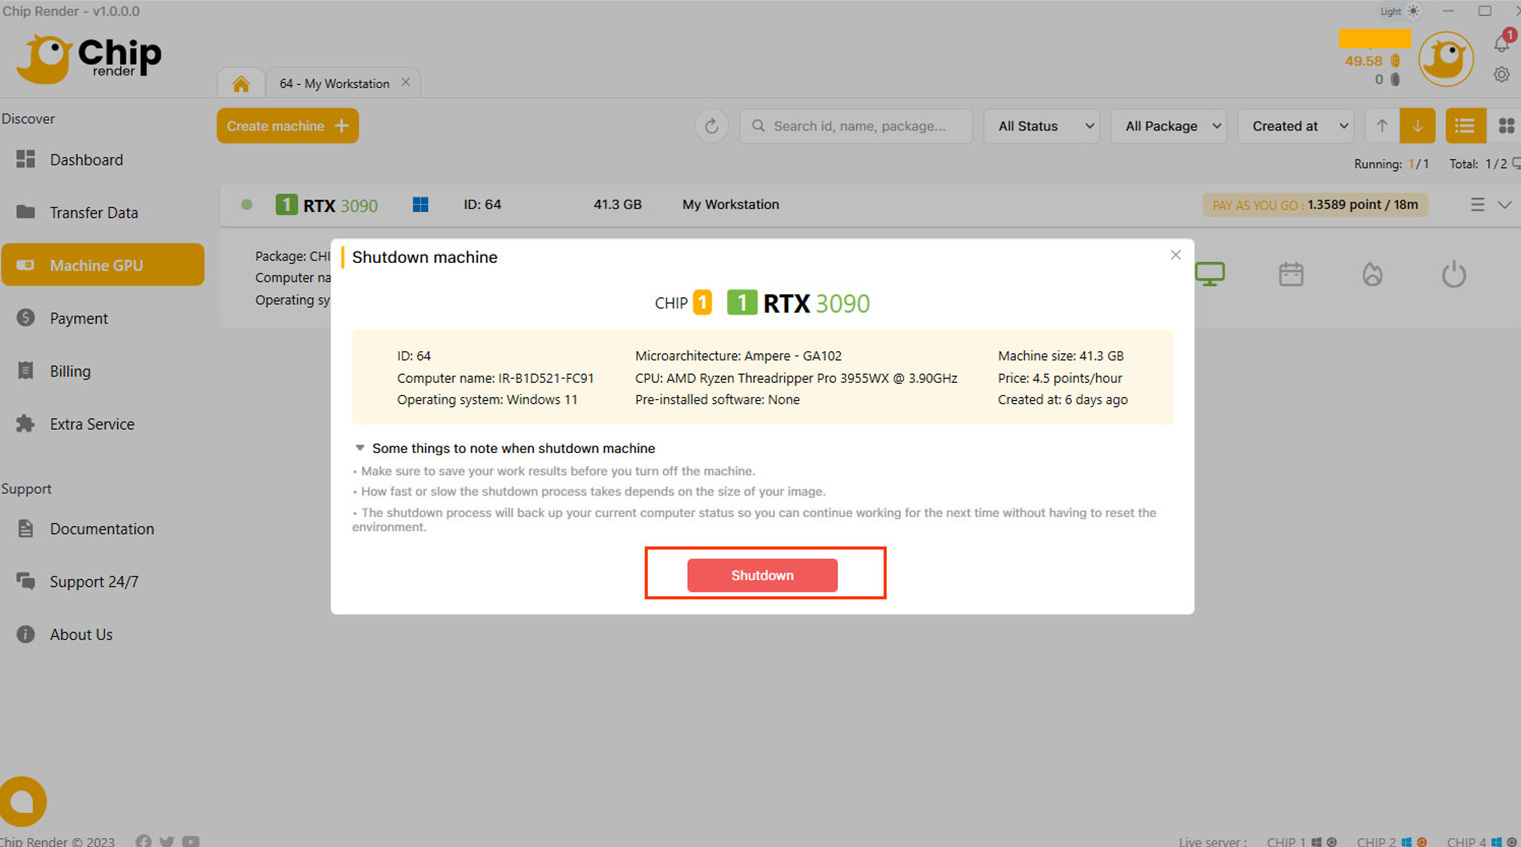
7. Shut down the machine
After rendering on the server, move your result files from C: drive/Desktop to the OUTPUT (Y:) drive. These files will be synced to the Y drive in Transfer Data tab.
In this step, Chip Render allows you 2 options for you to shut down the remote server: normal shutdown and schedule shutdown.
- Normal shutdown: You press the red Shutdown button on the machine to stop our system from charging.
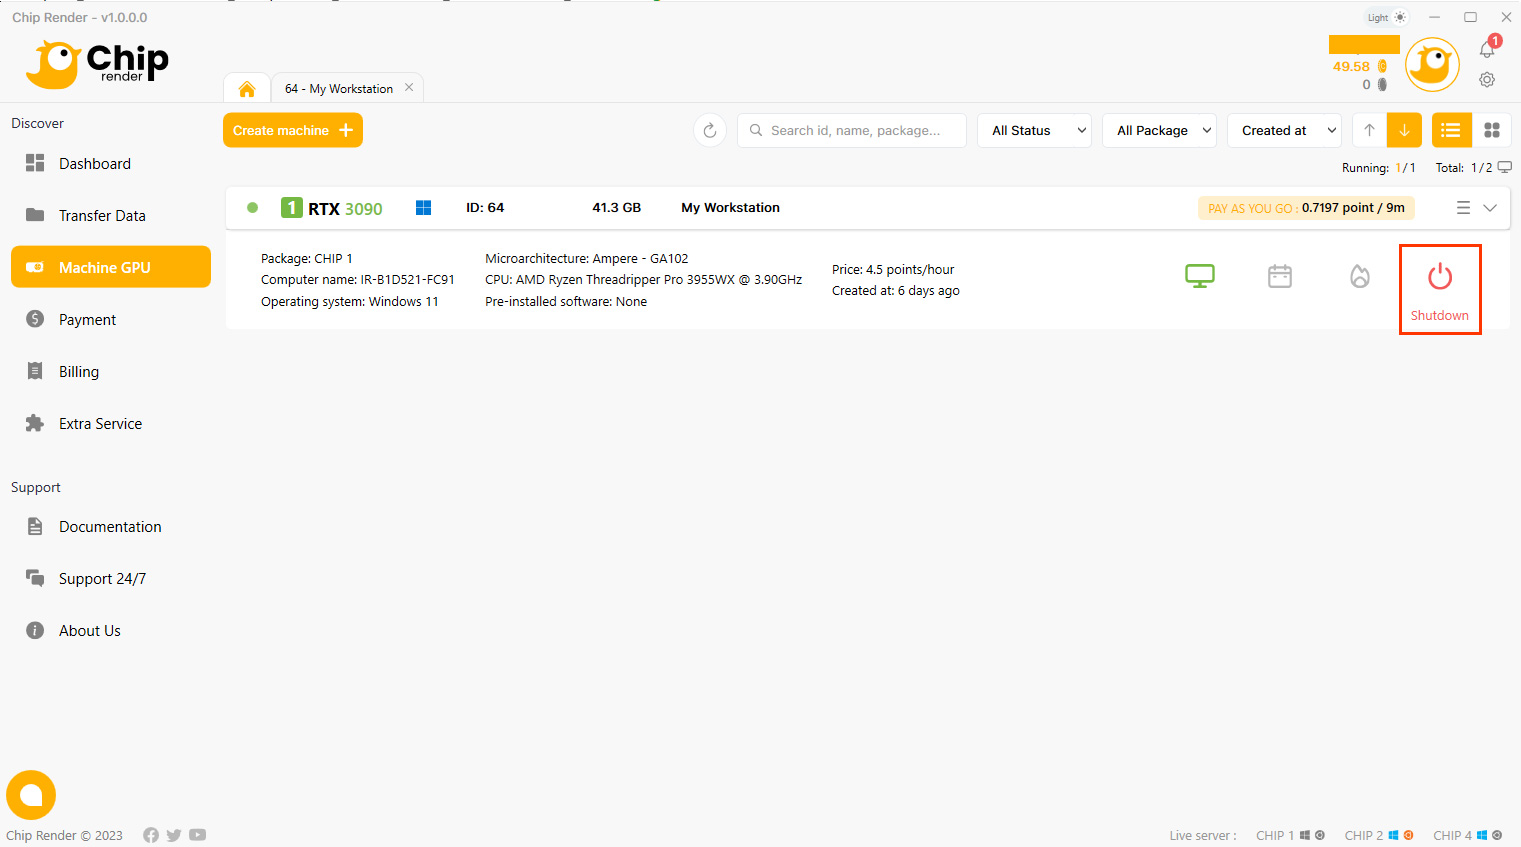
- Schedule shutdown: If you want to shut down your remote server at a specific time, click the “Scheduler” to schedule the shutdown time. Read more here.

Step 8. Get the render result
Download the result files from the OUTPUT (Y:) drive in Transfer Data tab.
If you have any questions, please don’t hesitate to contact our 24/7 Support Team HERE (link).
SYSTEM FEATURES
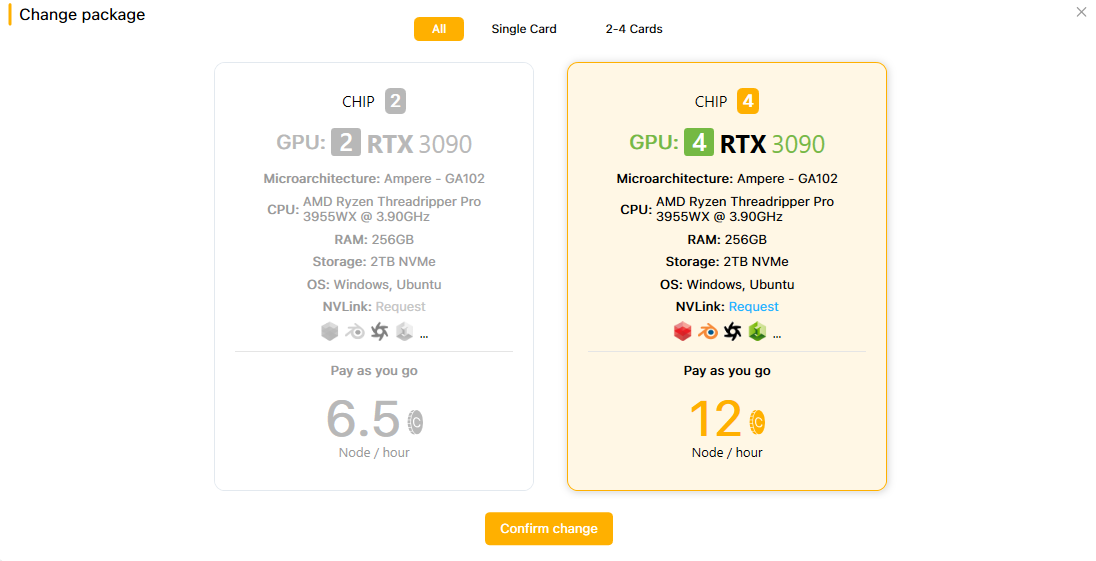
Change package
As your needs change, you might find that your machine type is over-utilized (the machine configuration is too low) or under-utilized (the machine configuration is too high). If this is the case, you can use the change package feature. For example, if your machine type with 2x RTX 3090 is too small for its workload, you can change it to another appropriate machine type for the workload, 4x RTX 3090.
Caution: To change the machine type, the machine must be in the stopped state.
To change the machine type
1. Choose the 3-line menu icon on the right corner of the selected machine» choose Change package.
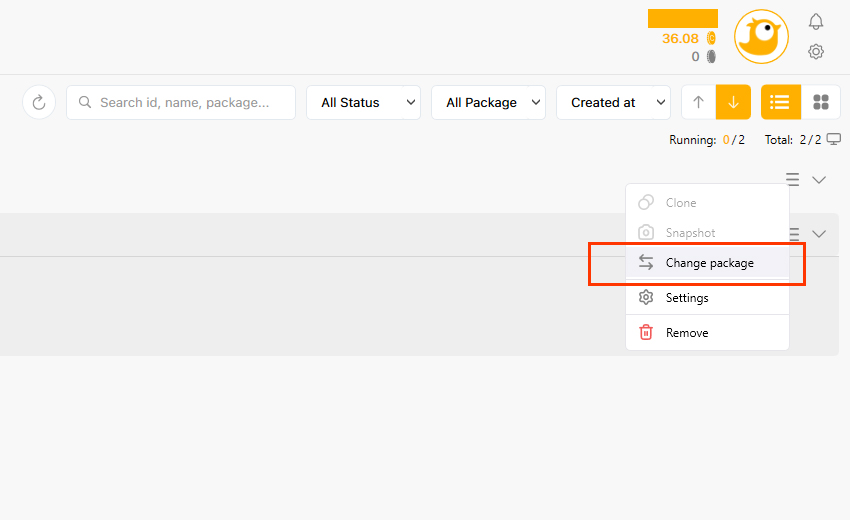
2. The Change service package box displays the Selection package, select one machine type you want to change » choose CONFIRM CHANGE.
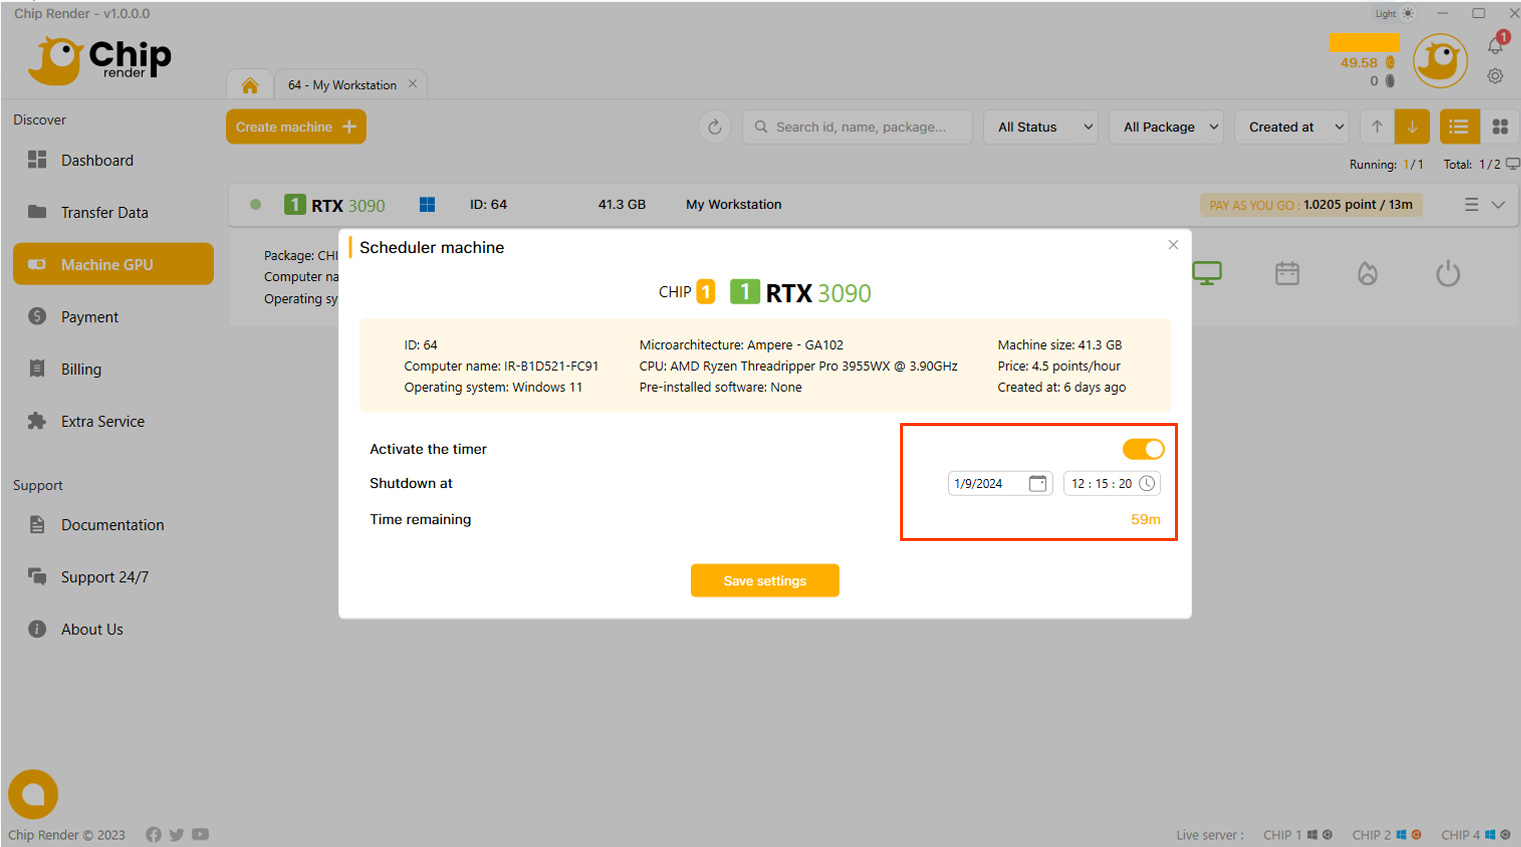
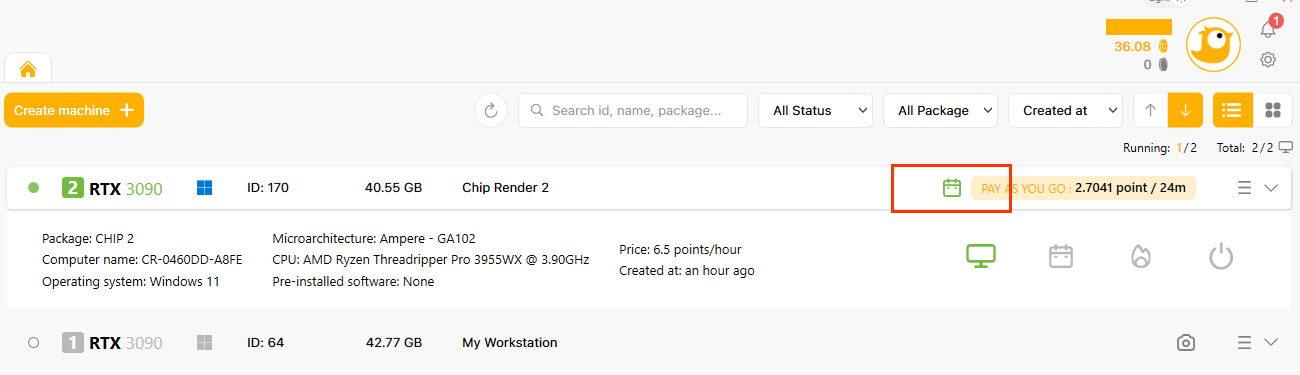
Schedule shutdown
Schedule Shutdown is to turn the machine off at a certain time. This feature is helpful when you are busy and do not have time to keep an eye on the machine screen. Just let the powerful machine render your projects and get the results later.
To schedule machine shutdown
1. On the machine screen, choose Scheduler.
2. The Scheduler machine box is open.
- Toggle Activate the timer on.
- Set up a specific time you want to shut down the machine.
- Choose SAVE SETTINGS.
3. On the top-left corner of the machine screen, the Red box displays the amount of time remaining.
Clone
In case you want to have multiple system machine that are the same, use Clone machine to replicate an existing image and all its storage devices. It enables you to take an exact copy of the existing machine without setting up the machine environment again.
Watch the tutorial video below or read the following instructions:
To clone a system machine
1. Click Ξ icon, choose Clone
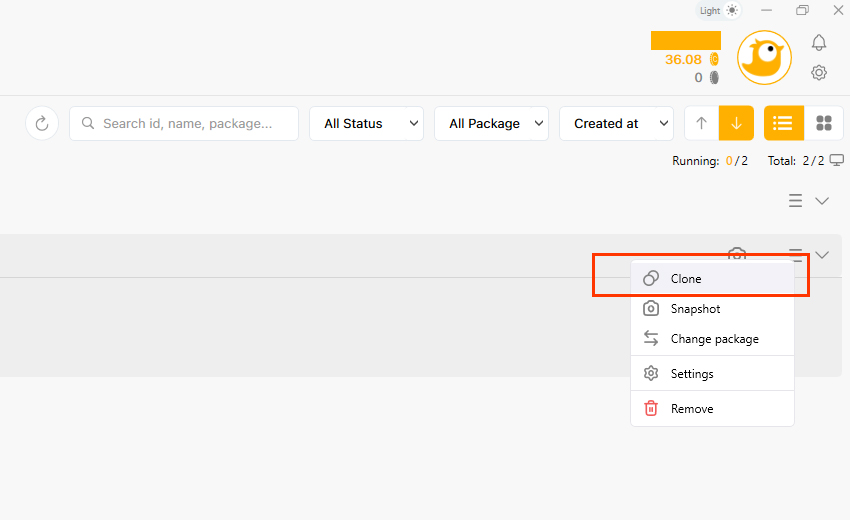
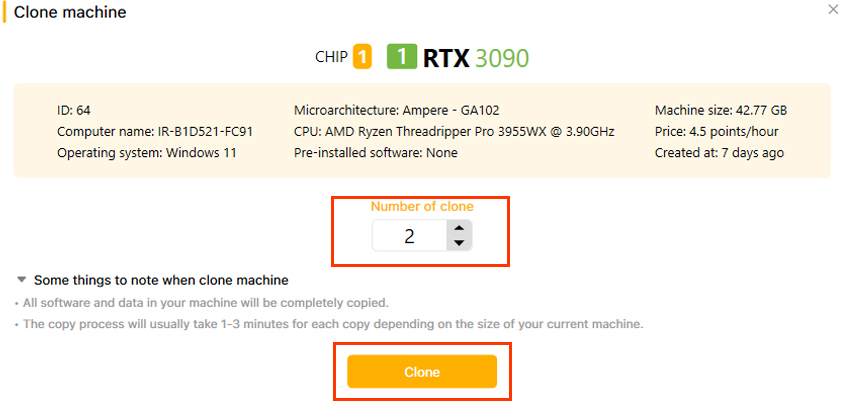
2. Enter the number of machine to clone (maximum is 5) » click Clone
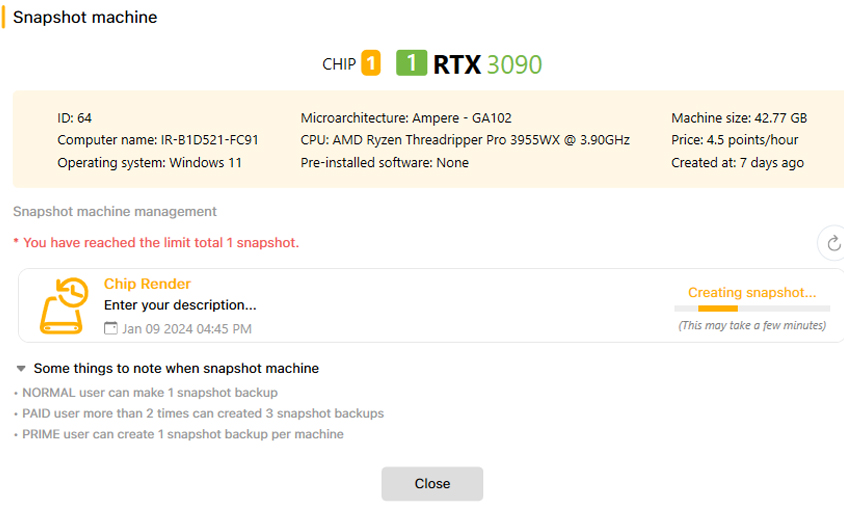
Snapshot
A snapshot backup is used for backup purposes, creating a backup copy of a disk file, software, or application of the server that you set up previously.
A snapshot backup can also be referred to as a machine backup. You can restore the machine backup if something goes wrong. The image will revert to exactly how it was at the time of the snapshot.
Note:
Normal customers:
- Customers with 1 top-up can create only 1 snapshot backup.
- Customers with more than 1 top-up can create a total of 3 snapshot backups.
Prime customers: can create each snapshot backup for each machine.
To take a snapshot
Caution: Be sure the machine’s state is off. It is highly recommended to create the snapshot backup after completing the server setup.
1. Choose the 3-line menu icon on the right corner of the selected machine» select Snapshot.
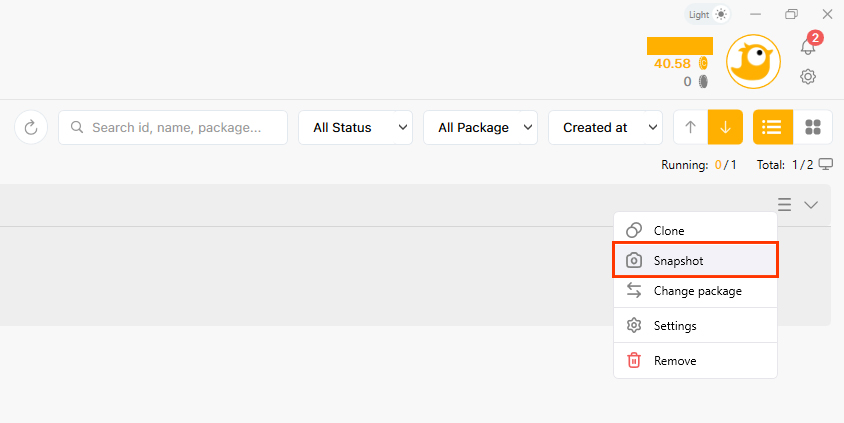
2. On the Snapshot machine box, choose + Create Snapshot.

3. Enter the name of the snapshot and a description of the snapshot » Choose Confirm.
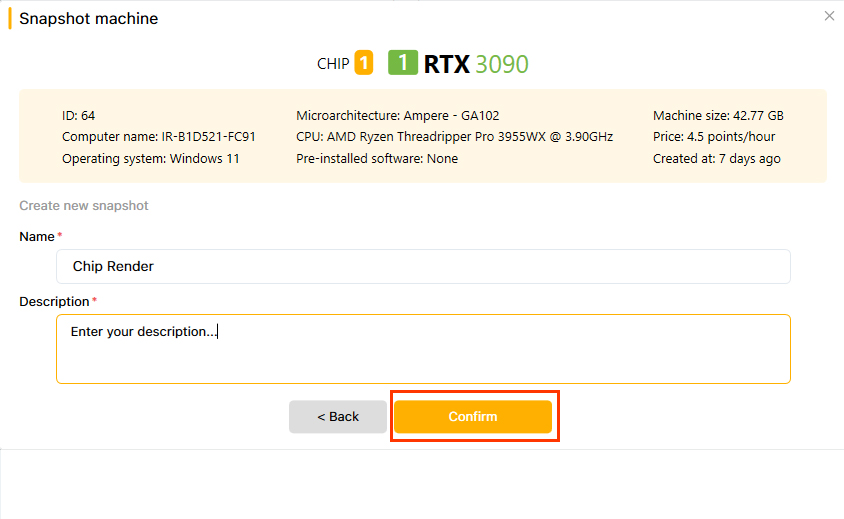
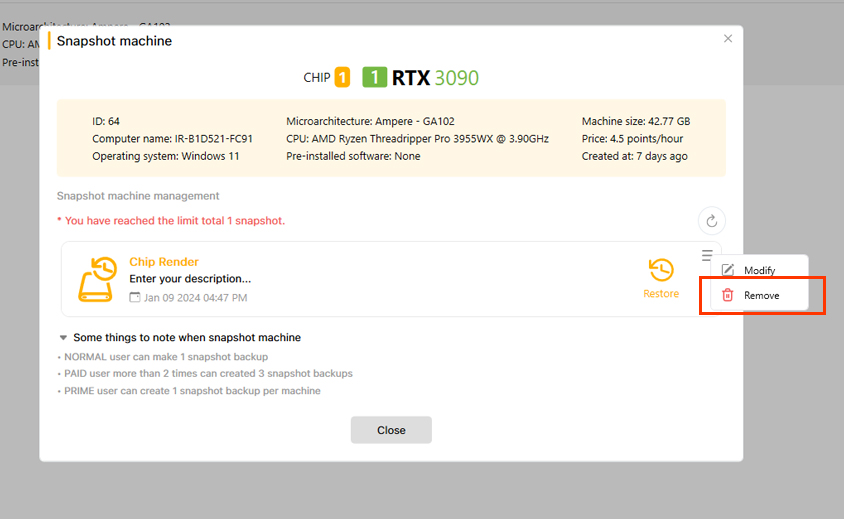
4. The snapshot backup or machine backup is created successfully as displayed in the following photo. Now, in case you want to restore the machine backup, choose Restore of the selected machine.
6. To create another snapshot of the machine, choose the 3-dot icon » choose to Remove » and then Create a snapshot again.
Report issues
In this post, we will guide you on reporting an issue to our technical support team while using the remote machine. After booting the machine, the remote machine is ready to use, and its state is running. Connecting to the remote server is entering your credentials through the remote desktop file. However, you may get some issues:
- In case of a black screen or can’t connect to the remote machine issue: Read specific solutions [link] for each issue. If it doesn’t work, you need to report issues.
- In case of some issues such as can’t connect to Z drive, data not found in Z drive, or others: you need to report issues.
The Report Issues feature tells us what issue you are having so that our support team can quickly address it.
To report issues
Notice that the server’s state is running. In the Chip Render console, click the Report Issues button.

In the Report issues box, select one issue you’re having:
- Unable to connect to the remote machine
- Black screen
- The blue screen “Please wait”
- “Reconnecting” error
- The remote connection is laggy, unstable.
- Can’t connect to X/Z drive.
- Data not found in Z drive.
- Other technical issues
Describing the issues in detail allows us to better support you, finally SUBMIT ISSUES or SUBMIT ISSUES AND CHAT WITH SUPPORT NOW.
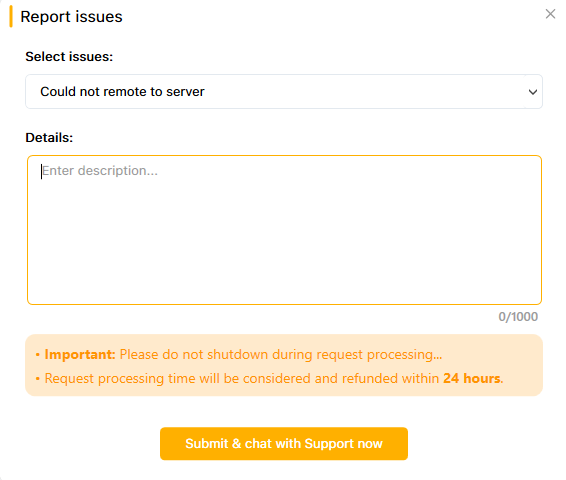
Note:
- Do not shut down the remote machine while the request is being processed.
- The request is processed within 24 hours. You may receive a refund when the processing time is too long.
- Once the issue is resolved, you will get a notification message shown on the top-right corner of the Chip Render console. It will also be sent to your email address.
- For better support and troubleshooting, you should contact us directly via live chat on the Chip Render console. So, our technical team can easily communicate with you if more information is needed.
Fixed MAC address
Typically, our system randomly distributes one computer across each remote session. As a result, you will connect to different computers for different remote sessions. In other words, the machine on the previous remote session you used can be different from that of the current remote session you use.
In case you want the machine in the current remote session to be the same as the machine in the next remote session, the Fixed MAC address feature is for you. This feature is to fix the server’s MAC address so that you are only able to boot and connect to that machine.
To fix the machine
1. Login application Chip Render App with account your Chip Render.
2. Navigate to Machine GPU on the left side of the page. All your system machines are listed.
3. Right-click on one selected machine or left-click on the 3-line menu icon » choose Settings » to enable Fixed MAC address» choose Save setting.
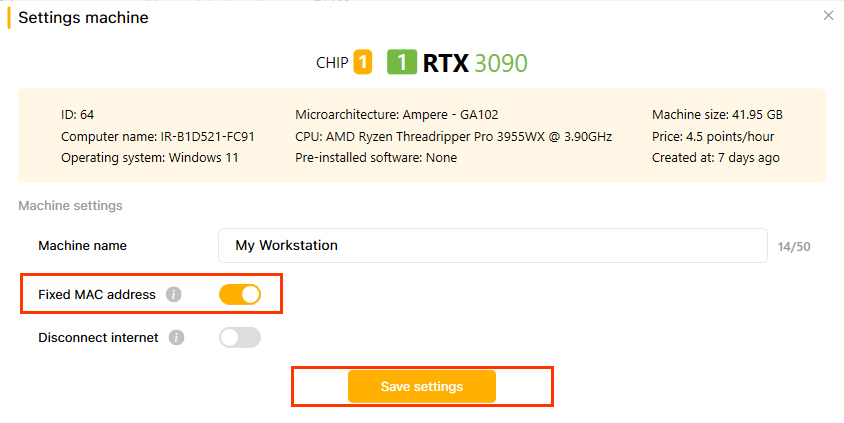
Disconnect internet
This feature allows you to disconnect from the internet on a remote server. You just need a few mouse clicks, the remote server will automatically disconnect from the internet.
1. Login application Chip Render App with your Chip Render account.
2. Navigate to Machine GPU on the left side of the page. All your system machines are listed.
3. Right-click on one selected machine or left-click on the 3-line menu icon » choose Settings » to enable Disconnect internet » choose Save setting.

Reset machine
In this section, we will guide you on how to troubleshoot some server errors when connecting to the remote server.
After booting the server, you connect to the system. However, you may get some errors such as a black screen, or can’t connect to the remote server, or the server hangs. How do troubleshoot these problems? The first solution is to wait for 2-3 minutes, then reconnect to the remote server. If it doesn’t work, you need to use the Reset machine function.
How to use
1. In the Chip Render console, click the icon on the top right corner of the machine here, and choose Reset machine » RESET.
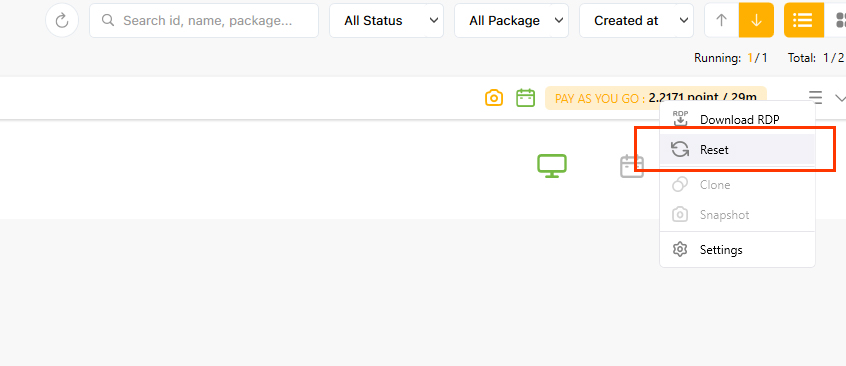
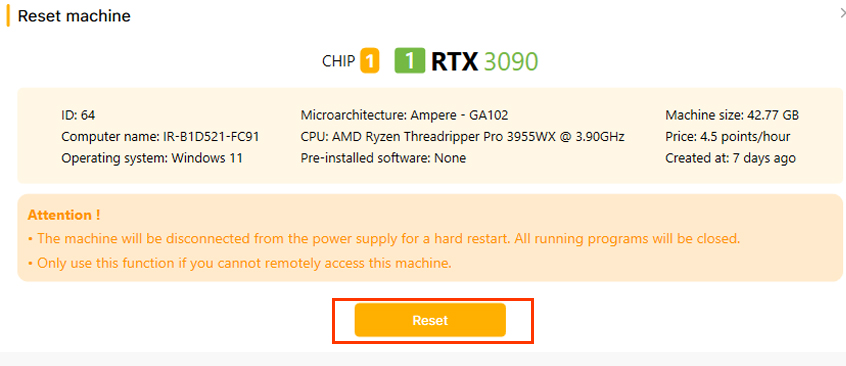
Information: You use the Reset machine function to reset the remote server, similar to hard restart, much as you would press the reset button on your physical computer when it comes unresponsive.
2. Waiting for a couple of minutes, you can open the system again, then enter your credentials to connect to the remote server.
Note: The Reset machine function is useful in case you cannot connect to the remote server right after booting successfully. If the server still doesn’t work after resetting, you should use the Report issues or contact our technical team via live chat.
Consider the Reset machine function while you are using the remote server as it may cause data loss.
ACCOUNT SETTING
Change your customer information
The following instructions below will help you to view your account details on the Chip Render dashboard and make changes if needed.
Go to the Settings page
- Open the Chip Render dashboard.
- On the top-right corner of the dashboard, choose the circle Setting
- On the Settings page, there are 7 tabs, including Account, Setting, Notification, Invoice & Billing, Security, Update, and About. Let’s take an in-depth look at each of them.
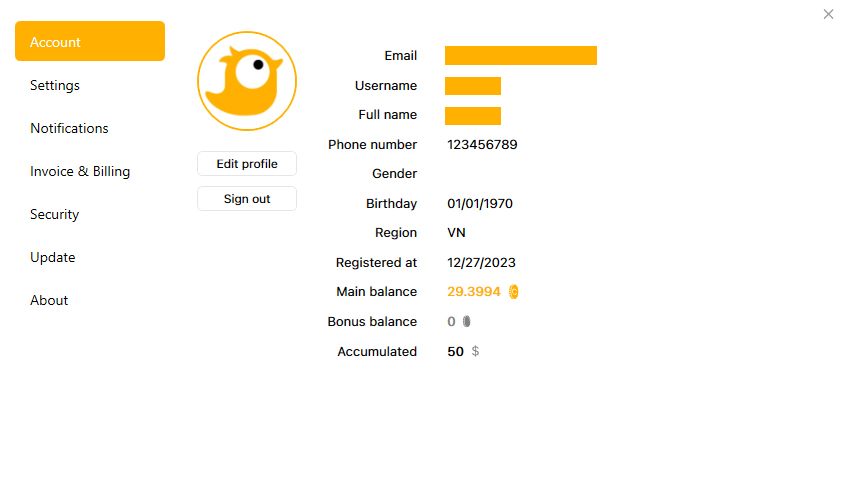
Account
On the Account tab, your detailed information is shown. In case one of them is incorrect, you can edit your information in the Edit profile button.
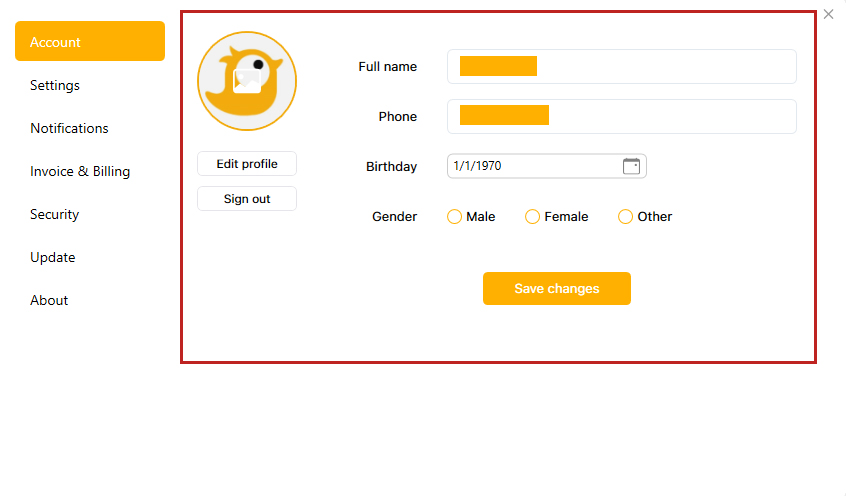
Edit profile
Here you can edit your Full name, Phone, Date of Birth, and Gender. You can even edit your profile picture.
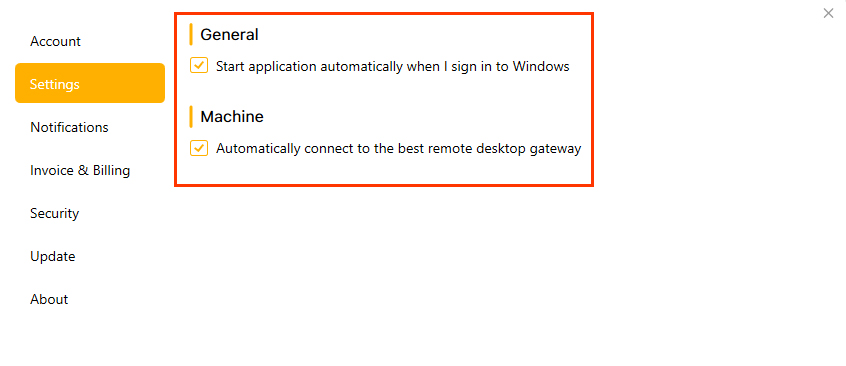
Settings
On the Settings tab, you can custom enable and disable:
- General: Start application automatically when I sign in to Windows.
- Machine: Automatically connect to the best remote desktop gateway.
Notifications
Here you can enable or disable the notifications option settings below if you want to edit.

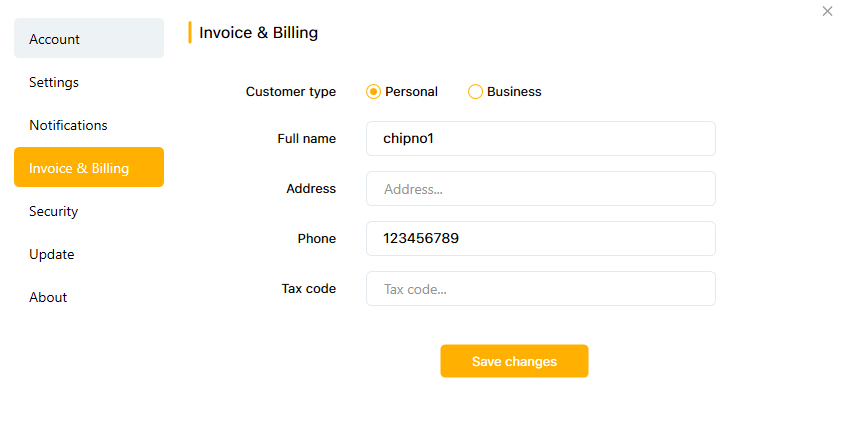
Invoice & Billing
It’s necessary when you get the invoice and billing with the correct information. We divided our customers into 2 types including Personal and Business.
- For Personal: you can edit your Full name, Phone, Address, Tax code.
- For Business: you can edit your Company name, Contact number, Address, Tax code.
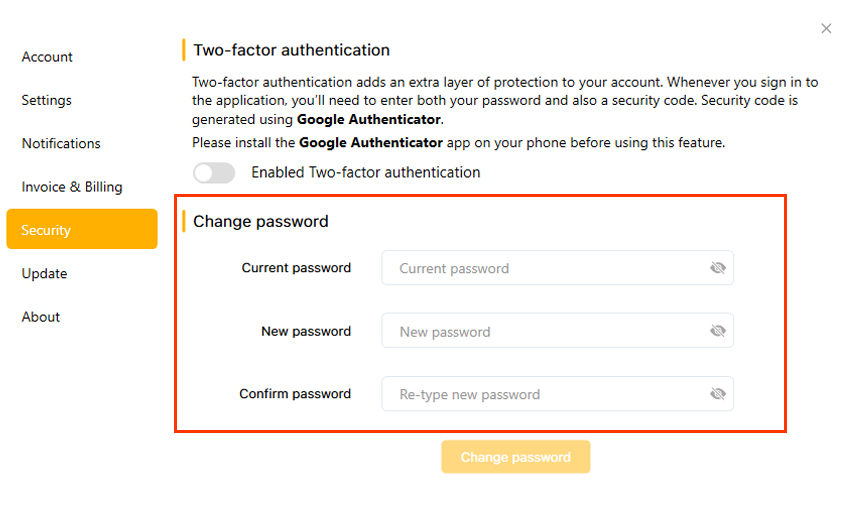
Security
On the Security tab, you can enable Two-factor authentication or change your password.
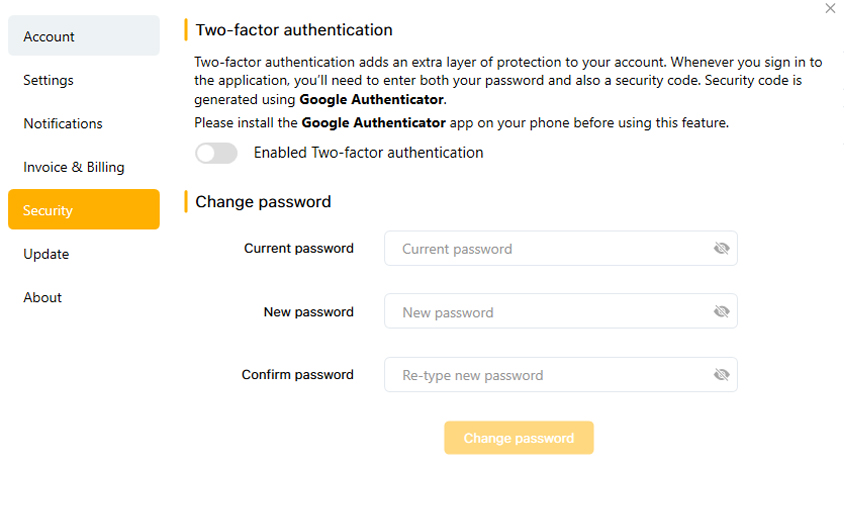
1. To enable Two-factor authentication
- Click Enable Two-factor authentication
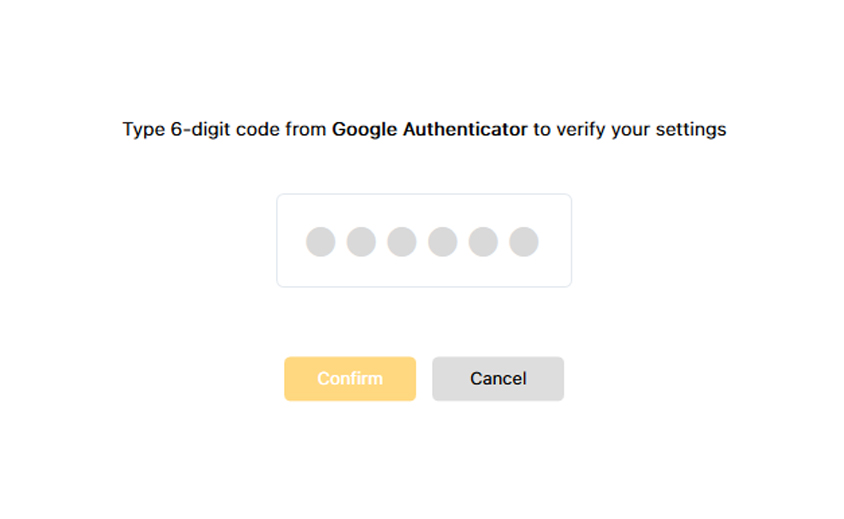
- A QR code then appears. Open Google Authenticator on your device, scan this QR code (or enter a setup key).
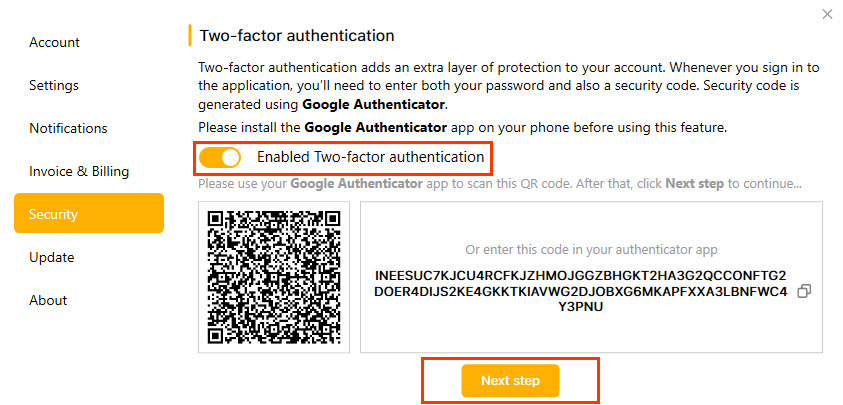
- Choose Next step. Then type a six-digit number from Google Authenticator to verify your settings » choose Confirm.
2. To Change password: Enter the information and click the Change password button.
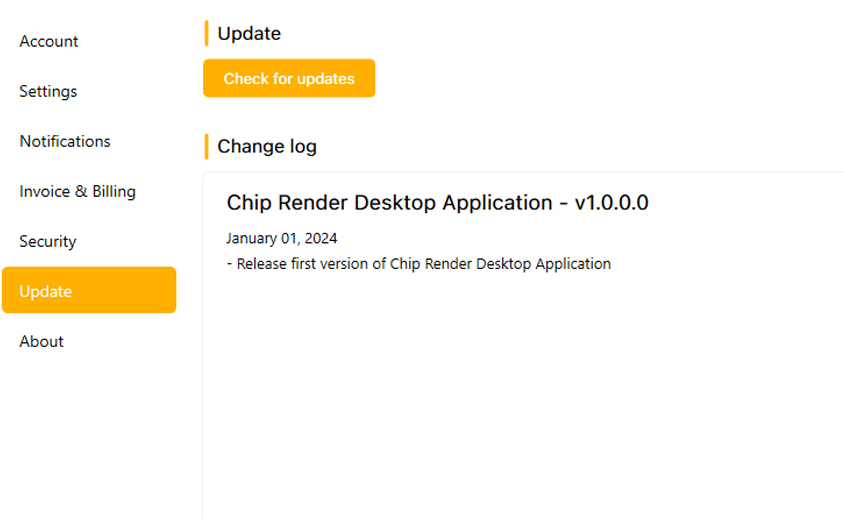
Update
Here you can Check for updates and get the Change log including all of the Chip Render App version updates.
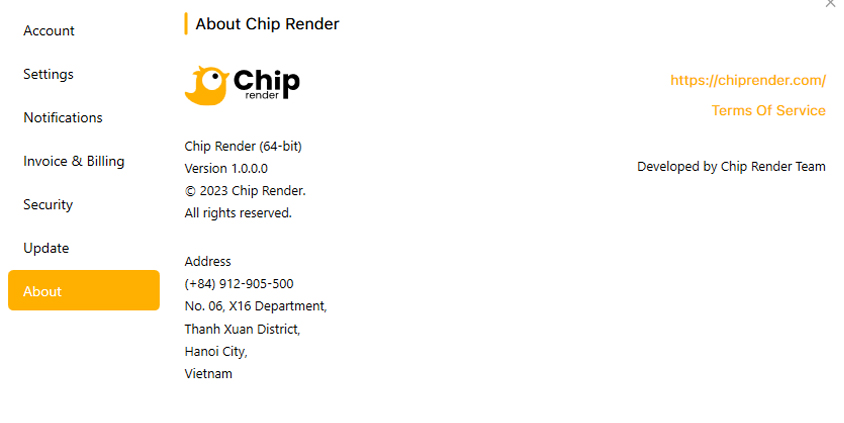
About
On the About tab, you can get the details of Chip Render App version and more.
Configure your notification settings
We will send notifications through your Email address or alert you directly on the Chip Render dashboard. If you want to receive specific information, configure your notification settings as described in the following instructions.
Go to Notifications
1. Open the Chip Render dashboard.
2. On the top-right corner of the dashboard, choose the circle-Settings » select Notifications.
3. On the Notifications page, there are 2 tabs including:
- Bell notifications: you’ll receive notifications on your Chip Render dashboard.
- Email notifications: you’ll receive email notifications through your Email address.
Some information will be notified directly on your Chip Render dashboard when you turn notifications on. In particular:
- Machine booted successfully: Notify that your machine has been booted successfully and is ready to connect.
- Account balance changes: Notify when your account balance changed.
- Deposit is successful: Notify when you have successfully deposited into your account.
- Promotion: Notify promotions, discounts, or special programs for loyal customers.
- Advertisement: Notify upcoming services or features, new server packages, the launch of new services, and so on.
Email notifications
Some information is sent to your email address to notify you. Turn the notification on if you want to receive it.
- Machine status messages: Notify the status of the image during the user session. These messages can be successful boot notifications, serve package changes, etc.
- Billing service messages: Get notifications about the billing after the user session ends, or the invoice when using fixed rental images.
- Advertisement: Get notifications about upcoming services or features, new server packages, the launch of new services, and so on.
- Promotion: Get notifications about promotions, discounts, or special programs for loyal customers.
Pricing
Primary points vs Bonus points
- Chip Render points (CP) are the currency in which you pay for any use at Chip Render. After the server is shut down, you’ll get a billing stating how many CPs were deducted.
- To view all your billings, on the Chip Render App, go to Payment » select Transaction History.
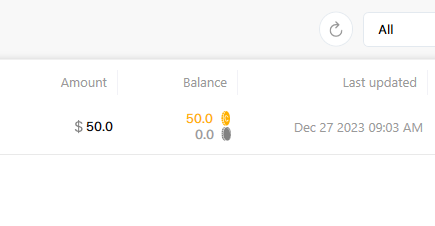
Chip Render points are divided into 2 types, Primary points, and Bonus points.
- The primary points (marked in yellow): the amount of money you pay is converted into Primary points. Use these points for any price plans ranging from hourly to monthly plans.
- The bonus points (marked in grey): when you pay from $180, you’ll get a bonus. The bonus is then added into Bonus points. The picture below describes the number of bonus points you’ll get based on the amount of money you pay
Invoices
By default, Chip Render generates an invoice after your payment is successful. Payments through Payoneer or Bank Transfer, their invoices are generated later.
You can always check and download your invoices.
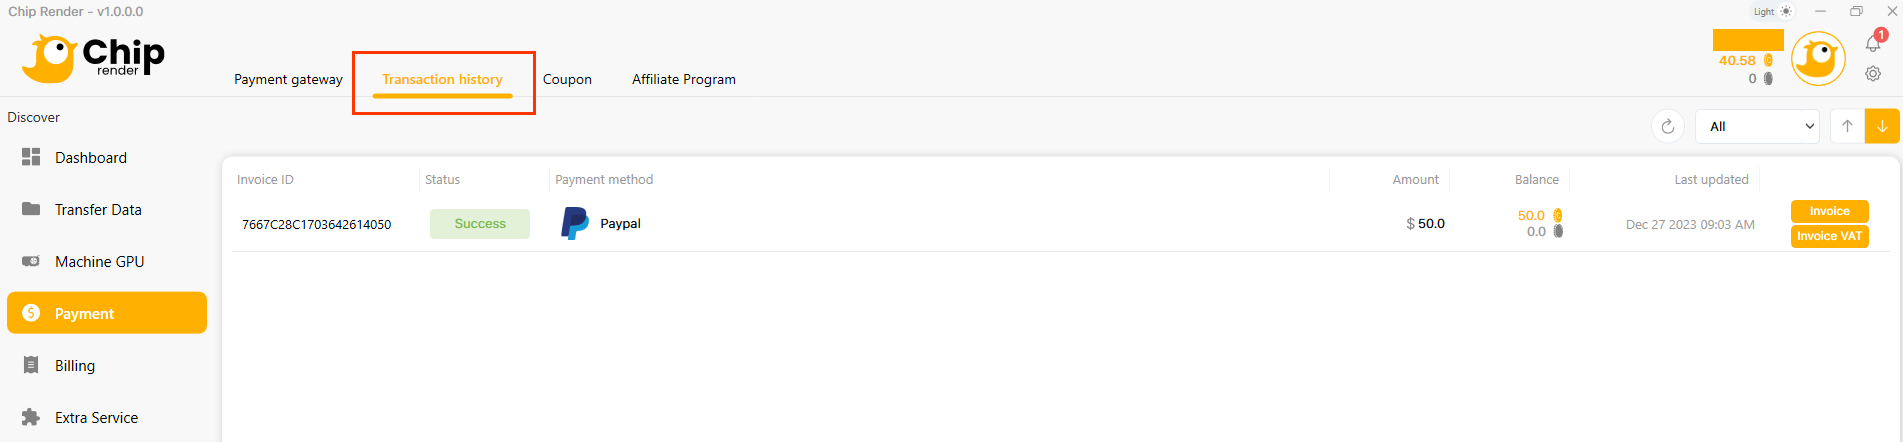
- Open Render App, Go to Payment » select Transaction History.
- In the Transaction History section, you can see all transactions are listed. Each successful transaction is highlighted, with invoice ID, status, amount, and Invoice.
- Click Invoice to show the details. To print or download the invoice, choose PRINT on the top-right of the page » Select an option in the Destination section.
- To print, select your printer » Print
- To download, select Save as PDF » Save
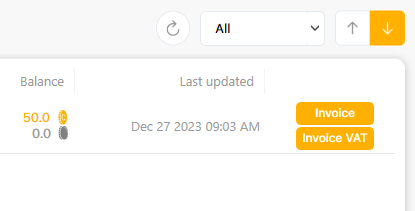
To download the Invoice VAT, choose the Invoice VAT button.
Note: If your invoice has the wrong address or details, you can:
- On the top-right, choose circle Setting » select Invoice & Billing, and edit your information » select Save changes button.
- However, for the previous invoice, send details to [email protected]
AFFILIATE PROGRAM
You can earn points by referring people to use our service where we call you is our referrer.
1. Definitions
- Referrer: A person who refers another person. In this case, you are our referrer.
- Referee: A person who was referred by a referrer.
2. Benefits of a referrer
- You’ll get a cash referral bonus (or Chip Render points) equivalent to 20% of the first payment value of your referees (*). From your referees’ second payment onwards, you’ll get 5% of their payments.
- The affiliate program is valid for 1 year from the date of registration with a referral code.
For example, if your referee makes the first payment of $1000, you will get $200. For the second payment, with $2000, you’ll get 5% of $2000 worth $100.
3. Procedure
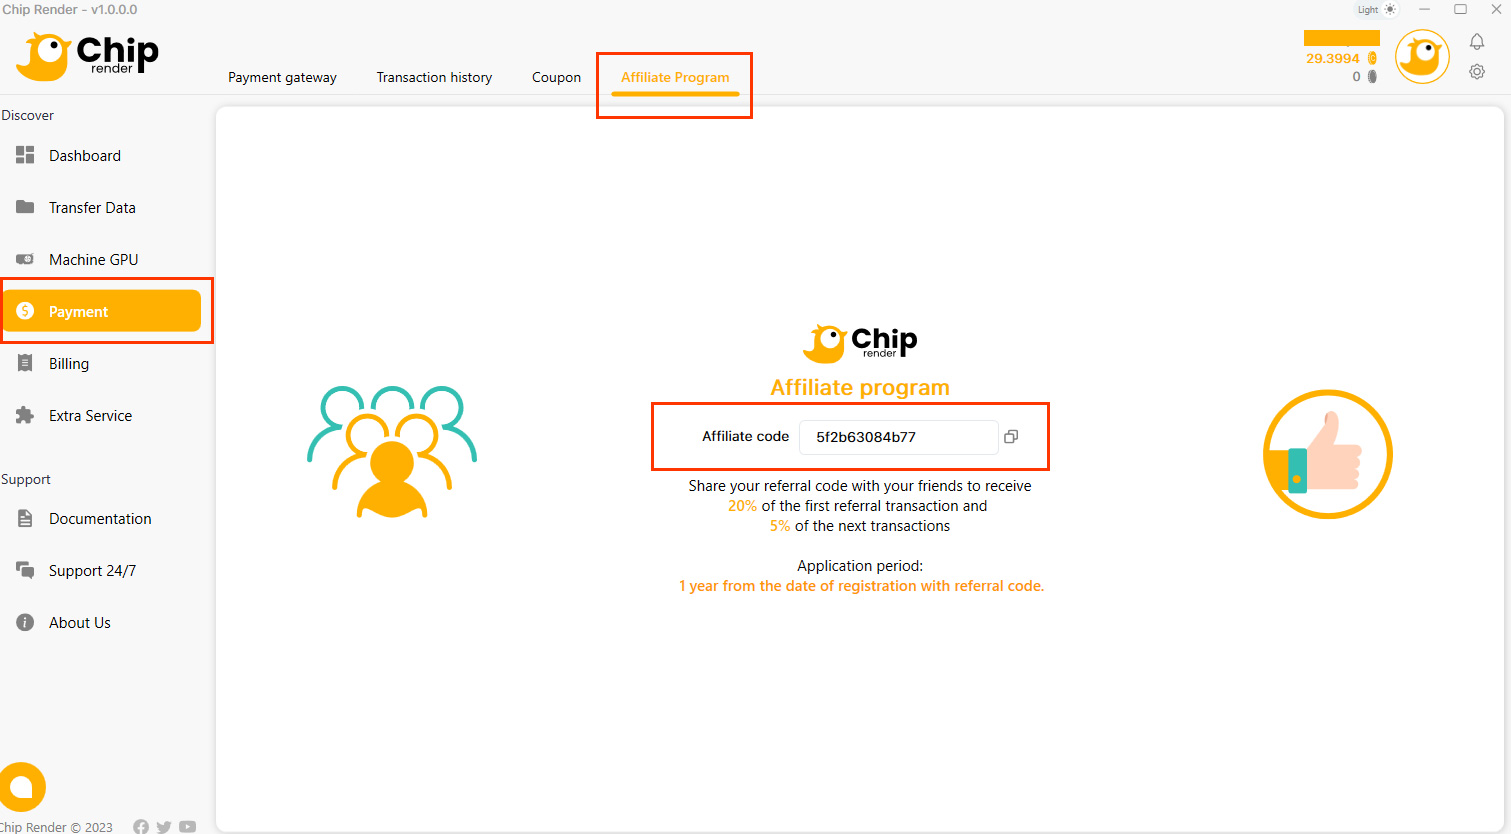
- Open the Chip Render App » Select Payment
- On the Payment » select Affiliate program.
- Click the Affiliate code button in the center of the page to copy your Affiliate code.
- Send your Affiliate code to other people who have never used our service before.
MUST-KNOW TIPS
Must-know tips for better using Chip Render
C drive is a hard drive while Z and X drives are network drives. C drive is to perform heavy tasks that require high computing performance, such as rendering, training Deep Learning models, etc. Z drive, synced with Chip Render App, is to transfer files. X drive contains common software installers.
There are some useful tips for using C, Z, and X drives on Chip Render remote servers.
1. Upload data to Chip Render App before booting
It’s suggested to upload the data files to Chip Render App before booting the machine. Depending on the amount of data you upload, it may take a few minutes or longer to sync.
You can check the sync process by clicking the Syncing at the vertical bar on the left side.
- Syncing shows that the folder is being synced to Z drive.
- Synced means the sync process is done. To save your money, you should boot the machine after your data is synced.
Note: In case it takes you too long to sync files, contact our technical support for help.
– INPUT (Z:): Upload your data to our servers, please upload your data projects to INPUT (Z:)
– OUTPUT (Y:): You can download the results file in OUTPUT (Y:), please move your output files from the C: drive to the OUTPUT (Y:) drive in Chip Render machine
Remember to compress the files in .zip format before uploading them to Chip Render App.
Chip Render App allows you to upload data anytime and anywhere. Especially for teamwork, each member can actively upload data files as long as they sign in to this app.
2. Install the software on a Desktop or C drive
Always keep in mind that you work everything on hard drives like C or Desktop, instead of network drives like X or Z. You might get installation errors when installing software on X or Z drive.
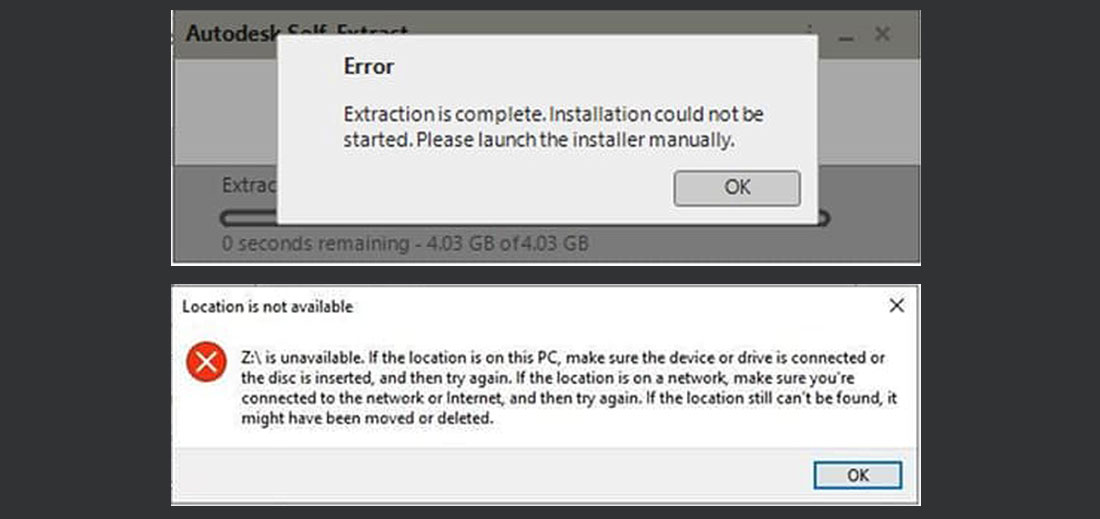
Reason
- Most software is not allowed to install via network drives (X or Z drive), so there is a system error.
- As X and Z drives are network drives, so if you open the installer file and install it directly on one of these 2 drives, you will experience a slow opening and a slow or laggy installation.
Solution
- If the installer you need is in X drive, just copy it to Desktop before installing.
- In case you need a different installer, you should transfer it to the remote server by Chip Render. You then copy it from Z drive to Desktop before installing it.
3. Open files from C drive or Desktop
Working on the C drive or Desktop is optimal to prevent crashes, as opening files directly from the Z drive may lead to connection loss and crashes. So, remember to move your file to the Desktop before opening it.
The hard drive (C/Desktop) is better at data recording and transmission speed than the network drive (Z drive). As a result, rendering through C drive is much faster and more stable. It’s highly recommended to prepare the data files to render in C drive or Desktop, instead of Z drive.
Let’s watch the below video to see the huge difference when rendering a project at C drive and Z drive.
4. Set output path at C drive to avoid data loss
Another tip you need to know is to set the output path on a hard drive like C or Desktop to avoid output data loss.
Imagine when you save the output path directly at a network drive like Z. As a result, the output files of your 3D rendering project may not be saved continuously when there is a temporary loss of connection.
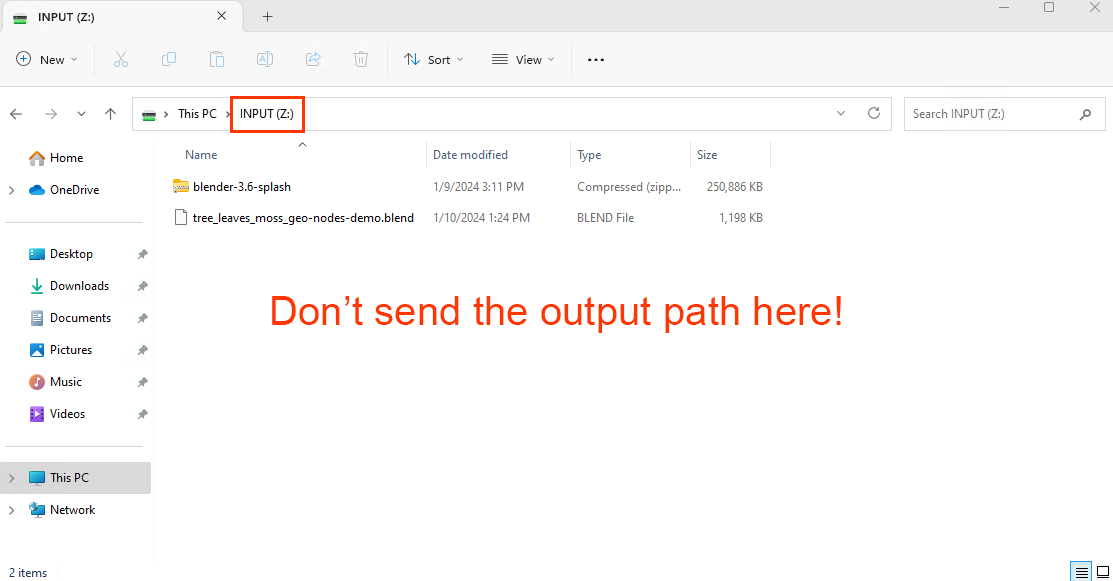
To avoid this unfortunate thing from happening:
- Set the output path at C drive first.
- After rendering, compress the output results in .zip format, then move it from the C drive to the Z drive. To receive the result, read this guide.
5. What to do when you don’t see enough X, Y and Z drive?
After successfully connecting to the machine, if you don’t see enough X, Y, and Z drives, please follow these steps: right-click on the desktop and select “Reconnect XZY Drives”.

The Chip Render undergoes continuous development, and while we strive for the utmost accuracy in our guides, it’s possible that some errors may have slipped through. If you come across any, kindly inform us so we can rectify them.
If you have any questions or requests, don’t hesitate, to contact our support team.

"We bring you the power of rendering, so you can get more time to enjoy your creativity!"